We teach AWS for the real world - not for certifications. Join more than 10,500 developers learning how to build real-world applications on AWS.
🤖 Bedrock & S3 Vectors: Smarter Related Posts with AI
AWS FOR THE REAL WORLD
⏱️
Reading time: 15 minutes
🎯
Main Learning: How to build an automated related posts feature by leveraging Bedrock Knowledge Bases and Amazon S3 Vectors for content discovery.
Hey Reader 👋🏽
Ever wanted to show folks “related posts” but didn’t want to build your own search from scratch? We’ve been playing with Bedrock Knowledgebases and S3 vectors, and turns out, it makes that job way easier than expected. We’ll go over how you can use these tools to connect your content and surface useful results—no fancy ML background needed. There are a few surprises in setup, so you’ll want to see how we worked around those. Let’s get right into it ⬇️ One issue we face a lot is that readers often want to discover more content. The AWS Fundamentals Blog has over 100 blog posts. But the issue is, you need to know what you are looking for. A common way of solving this problem is to show posts that are related to the current post somewhere in the article. This is exactly what we are building today. The End Result Shows Related Posts for Each New Blog PostLet's start with the end result. If you look on any blog post right now, you should see a section about Related Posts, looking like this: 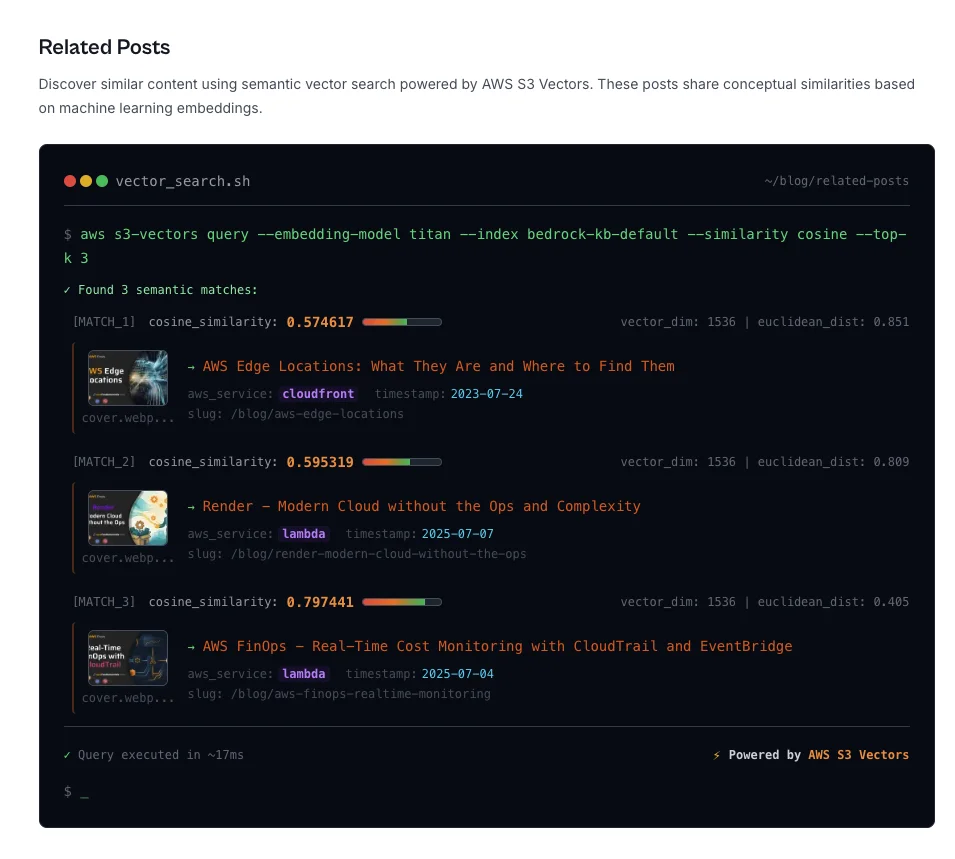
This shows that the post Localstack Debugging Edge Functions shows the related posts: Now, how did we build this? The Architecture Consists of Bedrock & S3 VectorsThe overall architecture consists of just two services:
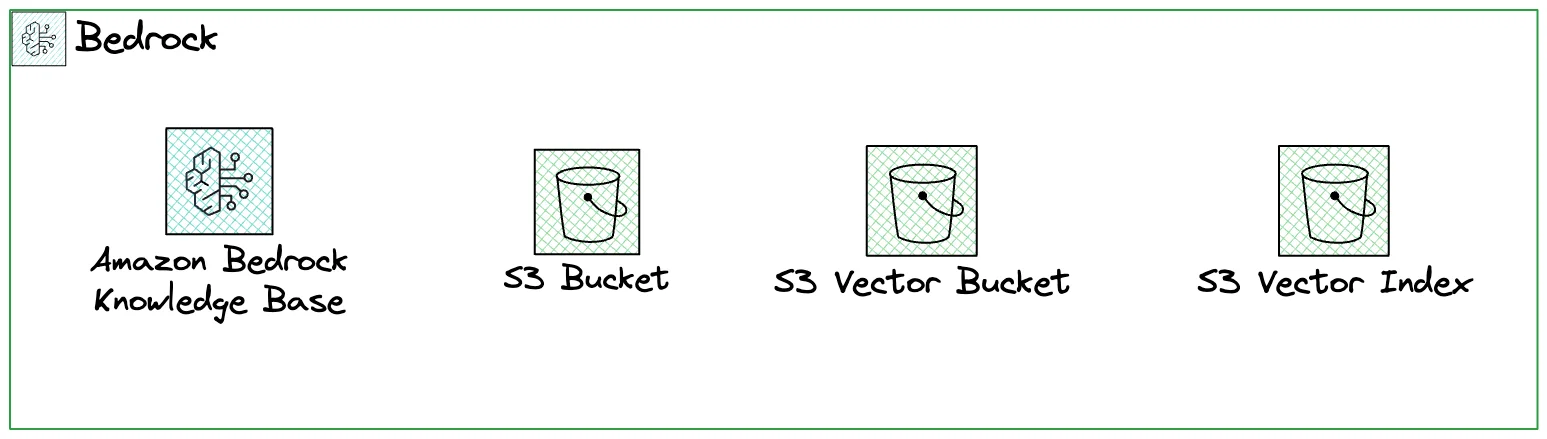
Bedrock for Building a Knowledge BaseBedrock is the service you will use mostly for building AI products on AWS. It gives you access to all the foundational models and developer tooling around it. AWS's quote in the introduction days of Bedrock was:
… and I think it is a great service, but can be quite complex to get started with. S3 for Storing Content and VectorsS3 is our classical S3 storage. But we don't use it only for storing data. We also store our vector index in the newly announced service S3 Vectors. This is one of the most exciting "AI" launches AWS had in the recent past. Building Related Posts from Uploading Content to Creating a Knowledge BaseLet's go ahead and build related posts step-by-step. I'll go into the details of each step on the way. Step 1 - Preparing and Uploading Content to S3
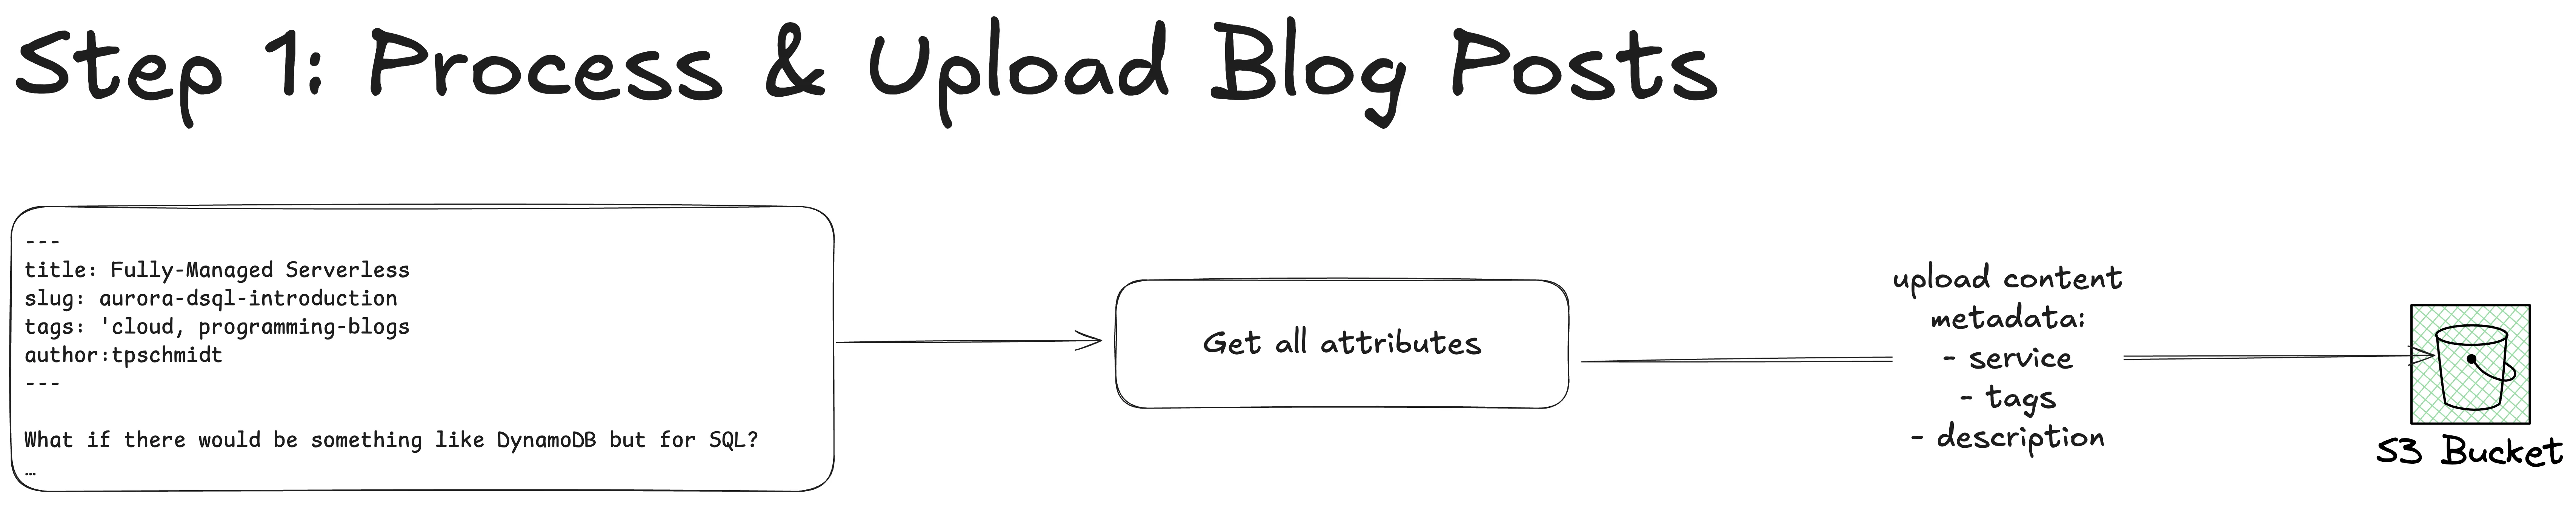
All our blog posts are in markdown format. And each blog post has a frontmatter with some metadata about the post. For example, the post Amazon DSQL Pricing Guide has this frontmatter:
MARKDOWN
After the frontmatter you can see how the content is starting. We will use the data within the frontmatter later on. For now, we have built a script which is uploading all of that content into a
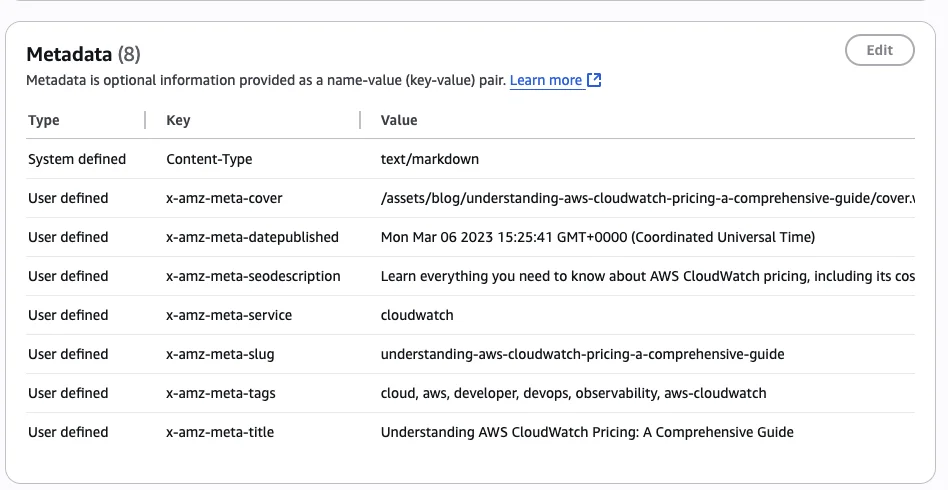
normal S3 bucket. The metadata of each S3 object looks like the following:
You can see that we have the following data in the metadata of each object available:
While the metadata is not super crucial here, it is quite useful because you can use it for filtering down your results more clearly. But more on that later. Step 2 - Creating your Knowledge Base in Bedrock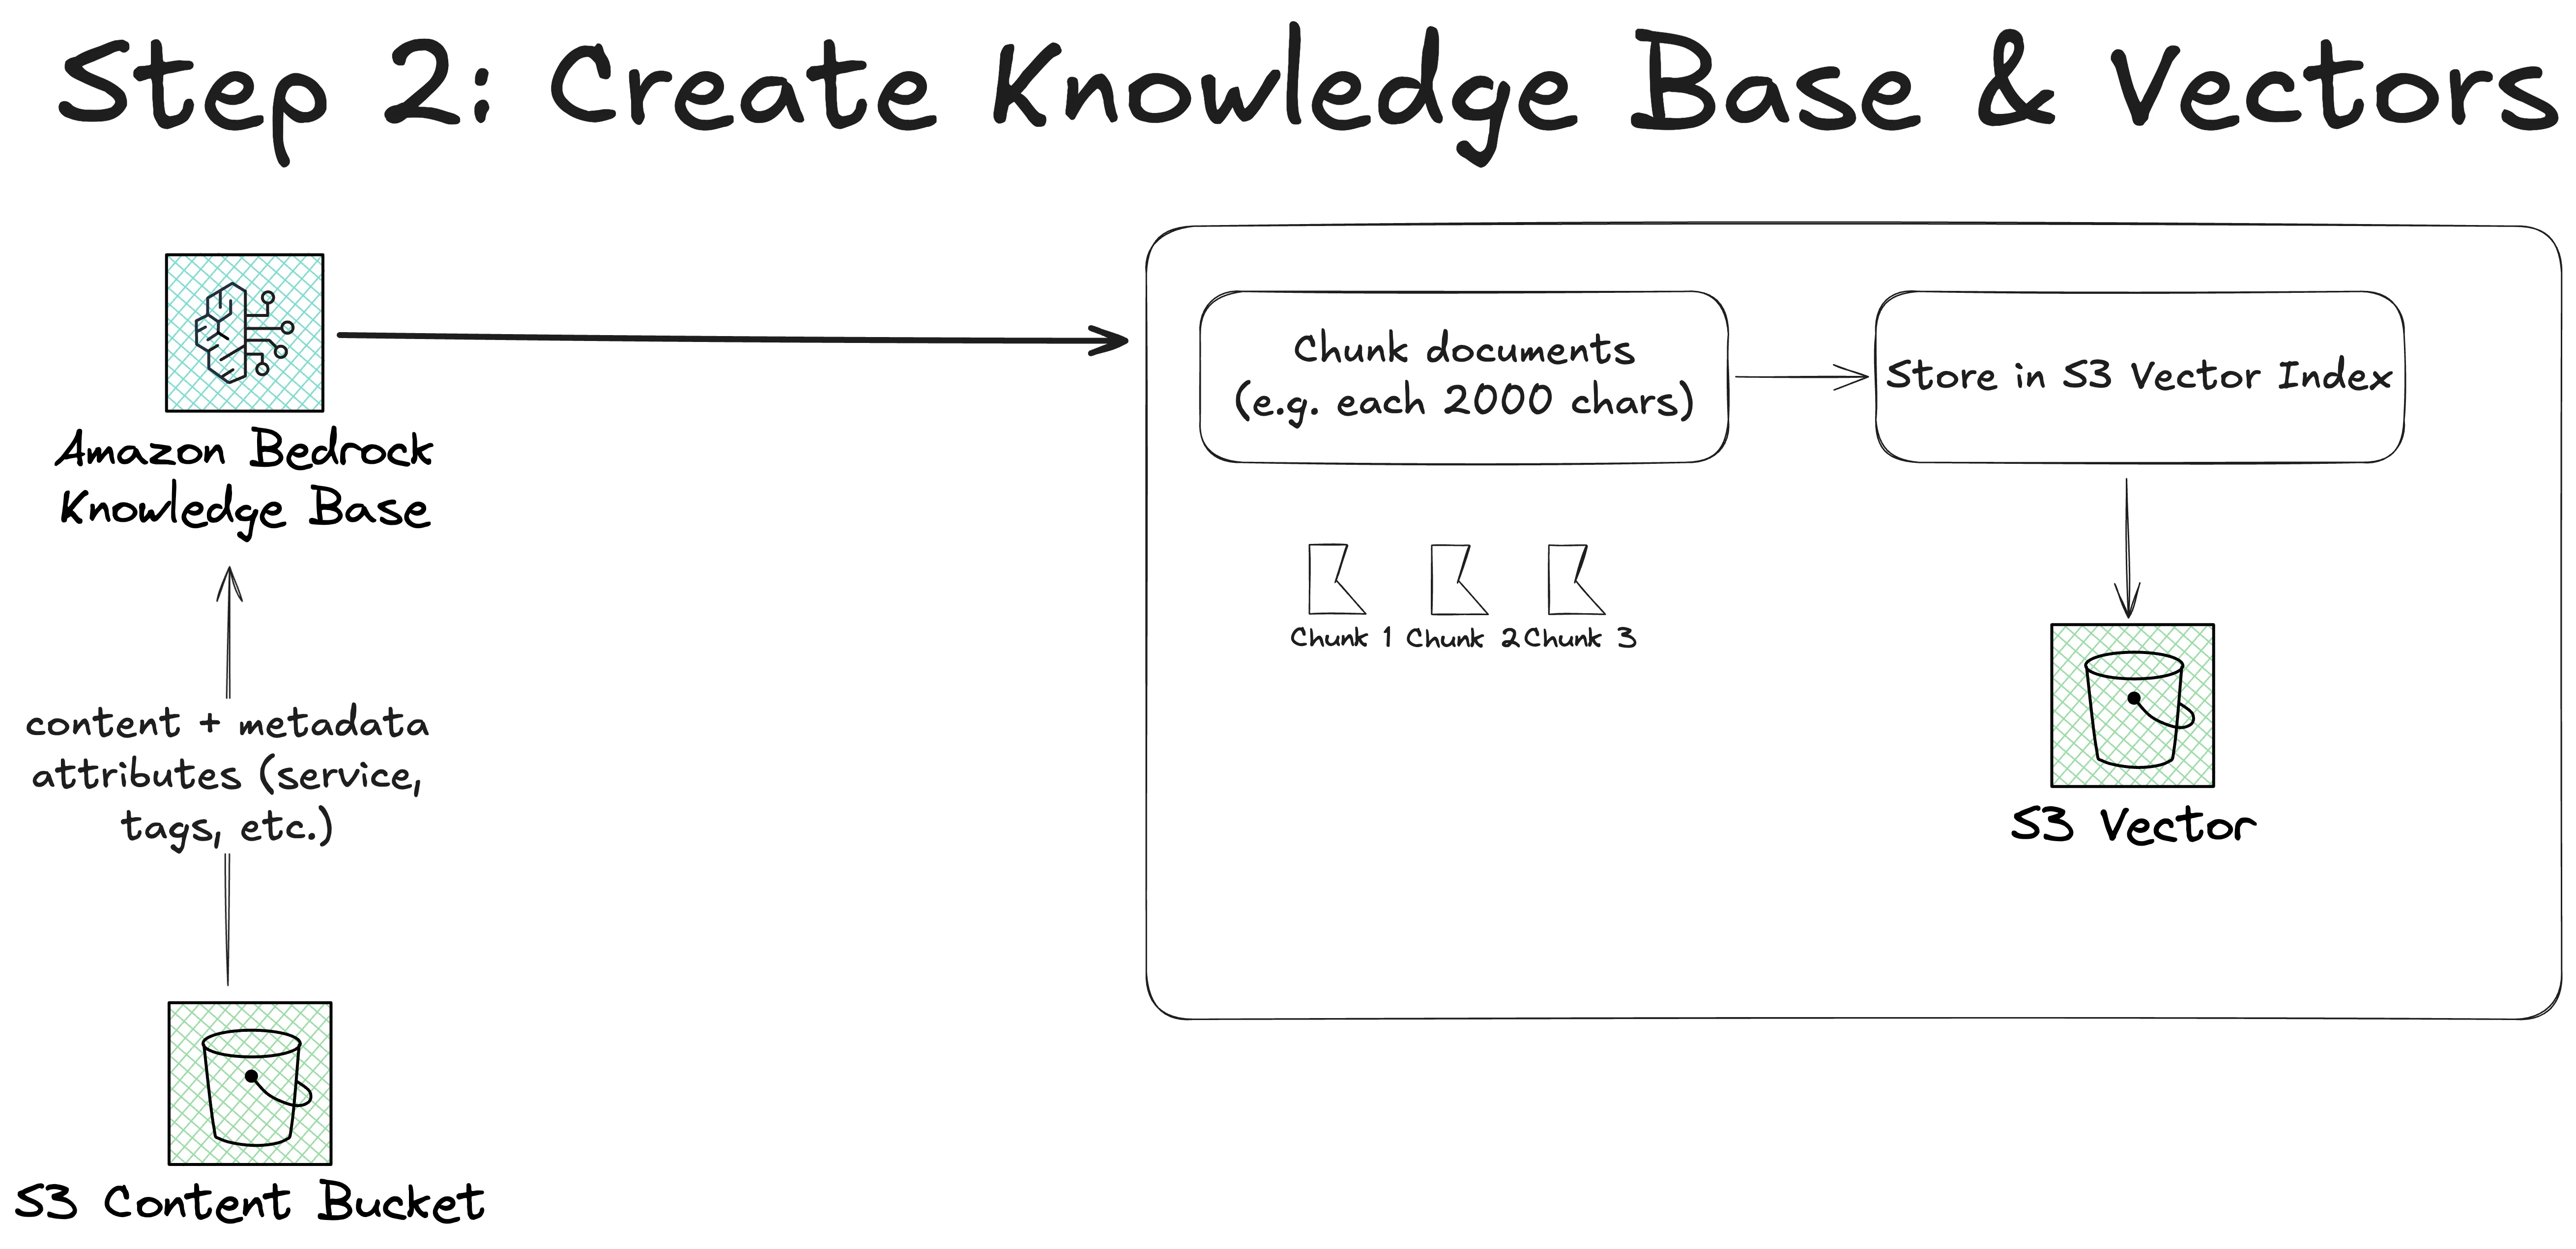
Now, we need to create a knowledge base in Bedrock. Since we want to use S3 as a vector store, we need to do that manually in the console. Because Terraform and Pulumi are not yet ready for it. See these two issues: Issue 1, Issue 2. For creating a knowledge base go into Bedrock and open up Knowledge Bases. In there, click on "Create" and "Knowledge Base with vector store" 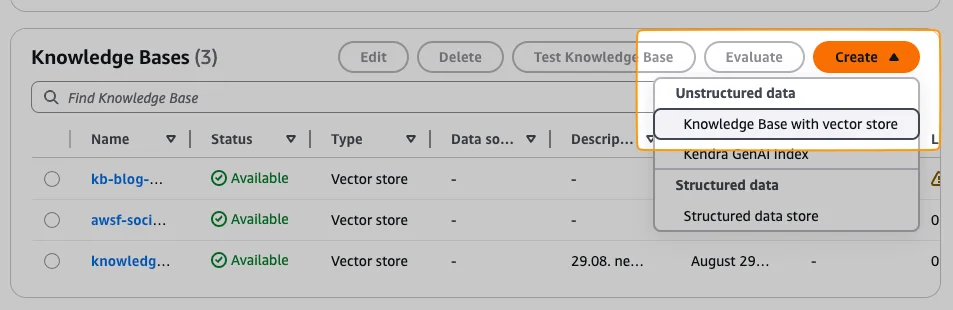
Now, you can see 4 steps you need to do. First, give your knowledge base a name like The more interesting part comes now with the data source. You have the ability to use various data sources like:
This already shows the flexibility and integrations Bedrock gives you. We just uploaded all our content to S3, so we use S3 as a data source. Log Delivery Important: Please add a log delivery to CloudWatch. I think this should be activated by default (like it is in Lambda functions as well). This will attach a Log Group to your Knowledge Base, so that you get information about all your syncing processes and failures. If you don't do this you will have no error messages at all in case something is failing. 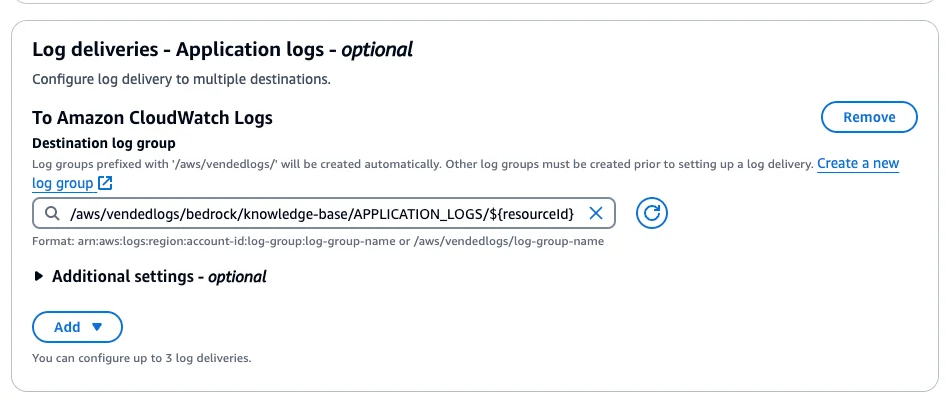
Step 3 - Data Source & ChunkingNow, we come to the interesting settings. How to set up the chunks of the content. For that, we need to understand a bit better how a vector store works. Vector Stores (feel free to skip this part if you just want to build!) In a vector store, we want to have a numerical representation of our content. Imagine a simple X and Y axis. 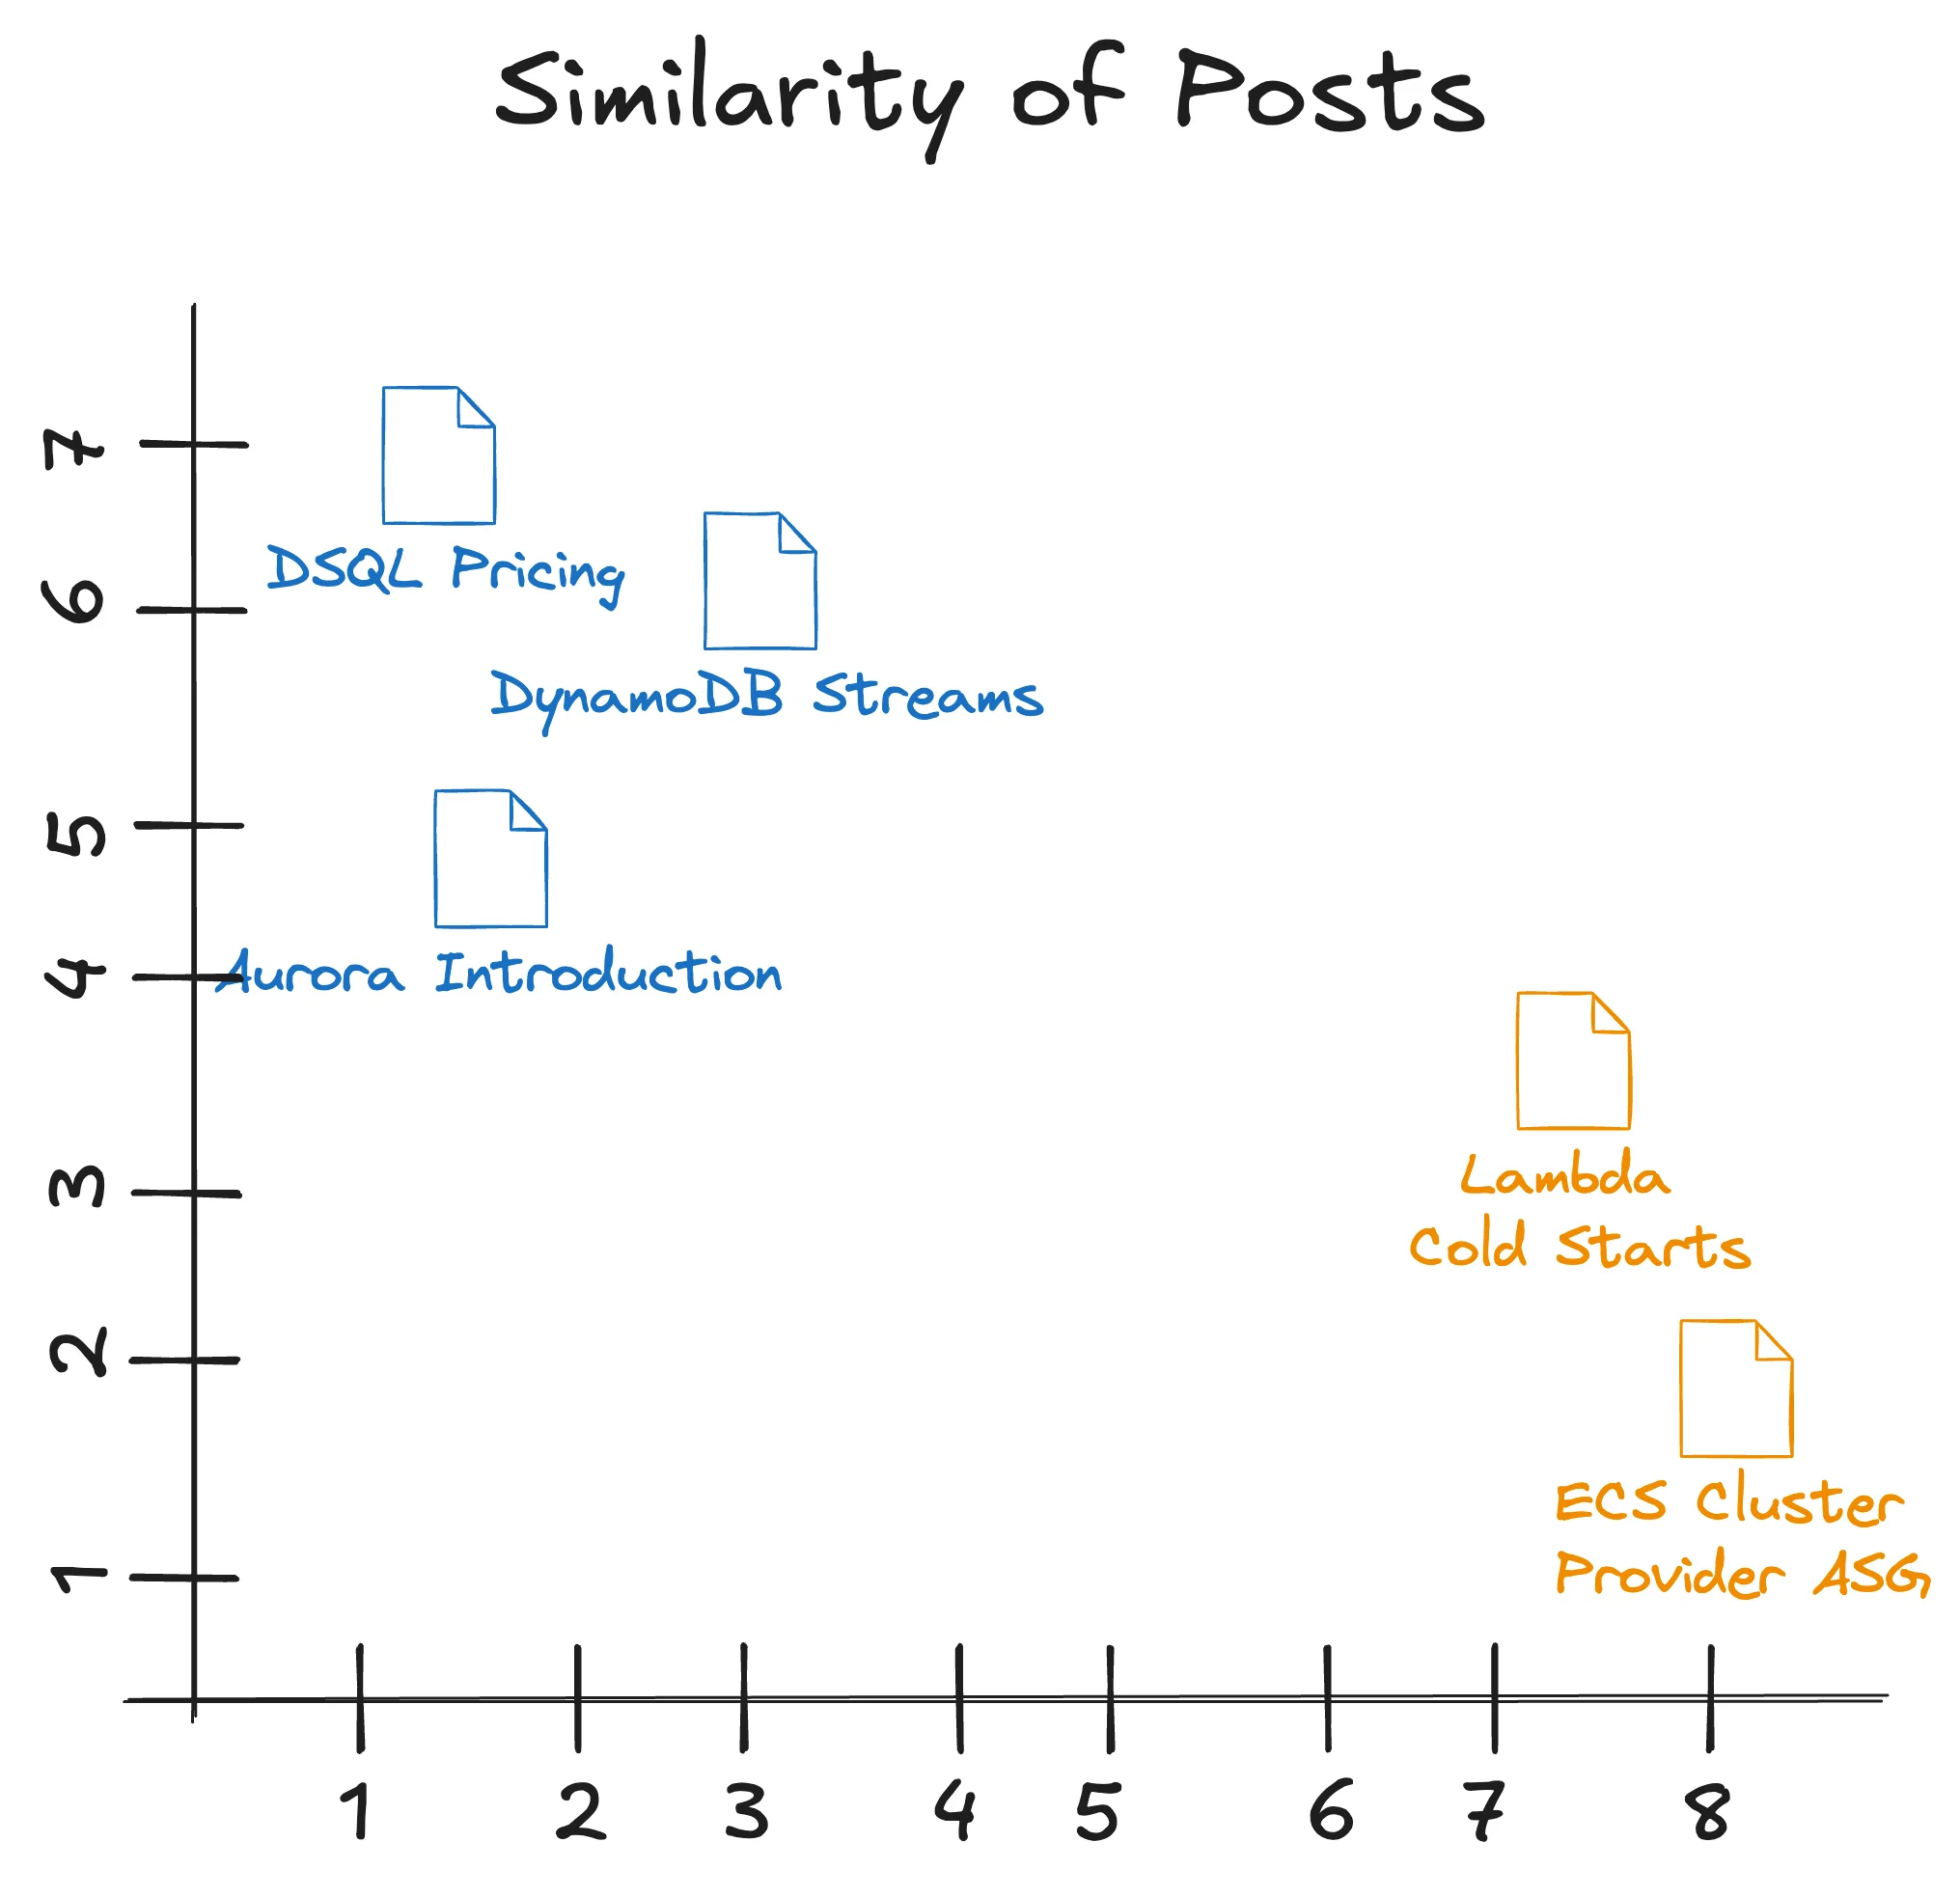
Each post (spoiler: it is actually a chunk, not a post) has its own numerical representation. The dimensions of our posts could look like that:
The meaning of the X and Y axes is not interesting for us. We only care that each blog post has its own numerical representation. And the interesting part is now to understand which of those posts are close to each other, and which are far away from each other. This is what we can simply calculate. In vector stores, you typically use one of the two Distance Metrics:
Let's calculate two similarities with Cosine Distance:
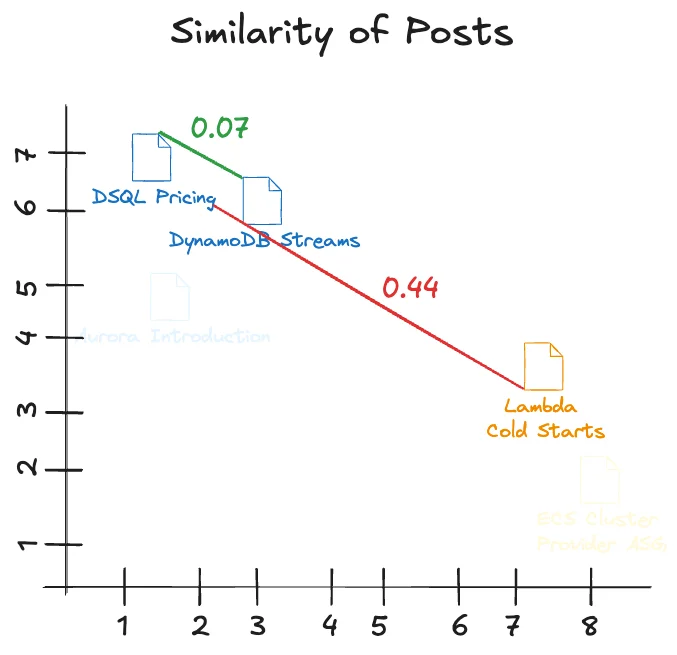
That shows that the first pair is very close to each other. The second pair is farther away from each other. Chunking & Embedding Now, I mentioned that we don't actually calculate the numerical representation of a post but that we have a chunk of a post. This is because a post is too big to fit into one number (technically). We first need to create several chunks chunk out of the post. And then embed the chunks into numerical representations. For example, instead of taking the whole pricing guide on DSQL. We take 2,000 character chunks, embed them with an AI model, and put them into the vector store. This means we don't actually compare the distance from several posts to each other, but the distance of chunks. This comes with some more trade-offs, but it is necessary since you cannot embed a large dataset at once. There are workarounds, but for our simple example we stay with chunks. Back to Building There are several options you can choose in Bedrock now. 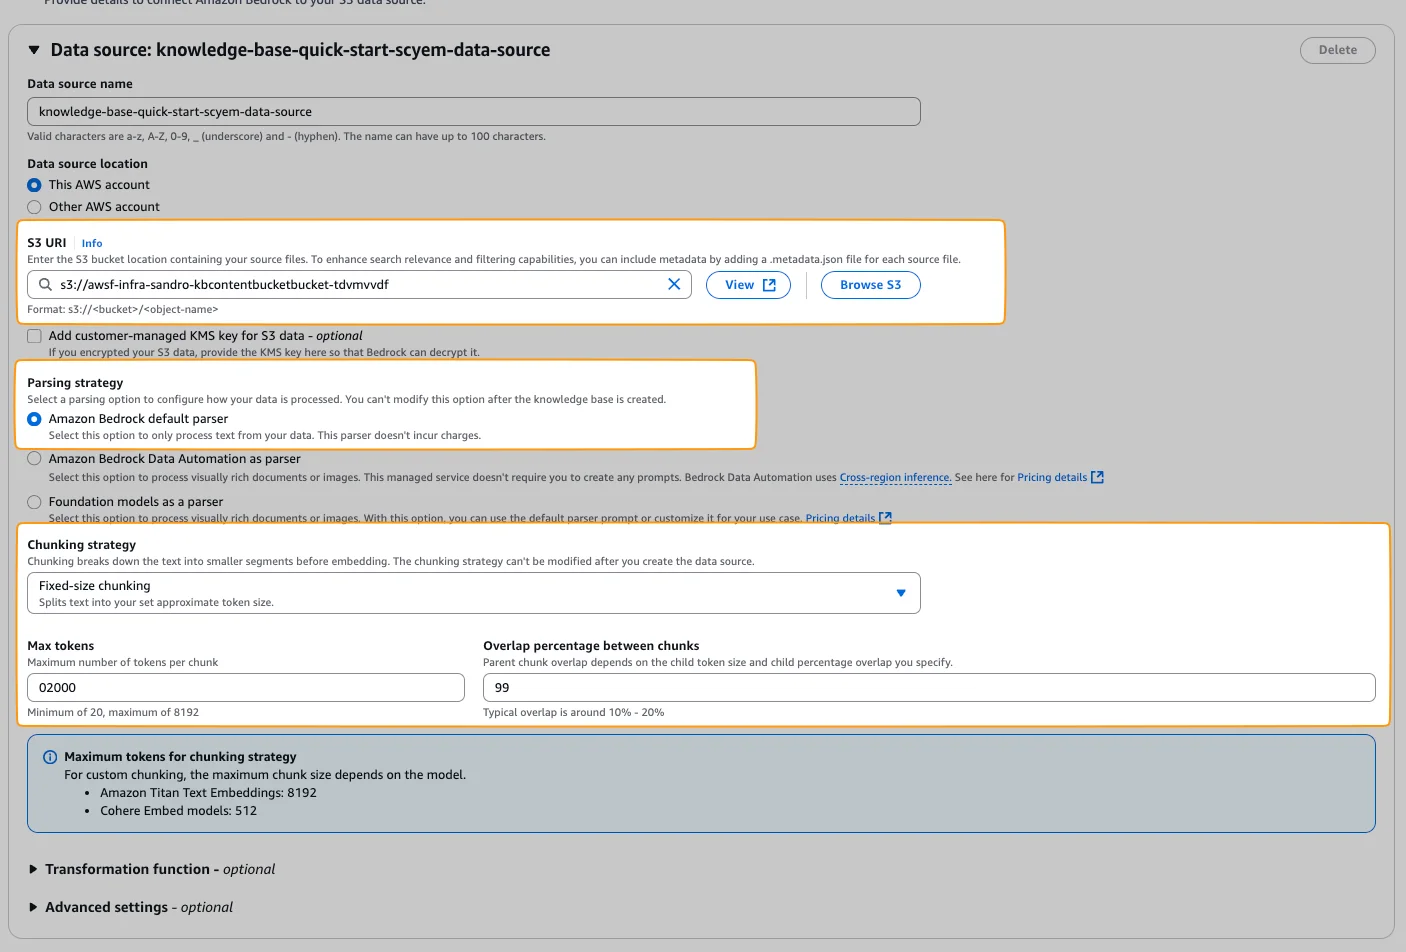
Select your Content Bucket first. Next, the parsing strategy. You can choose to use Bedrock's default parser or use other models as a parser. Since Bedrock's parser is free, we use this one. Then the chunking strategy. There are several ones like:
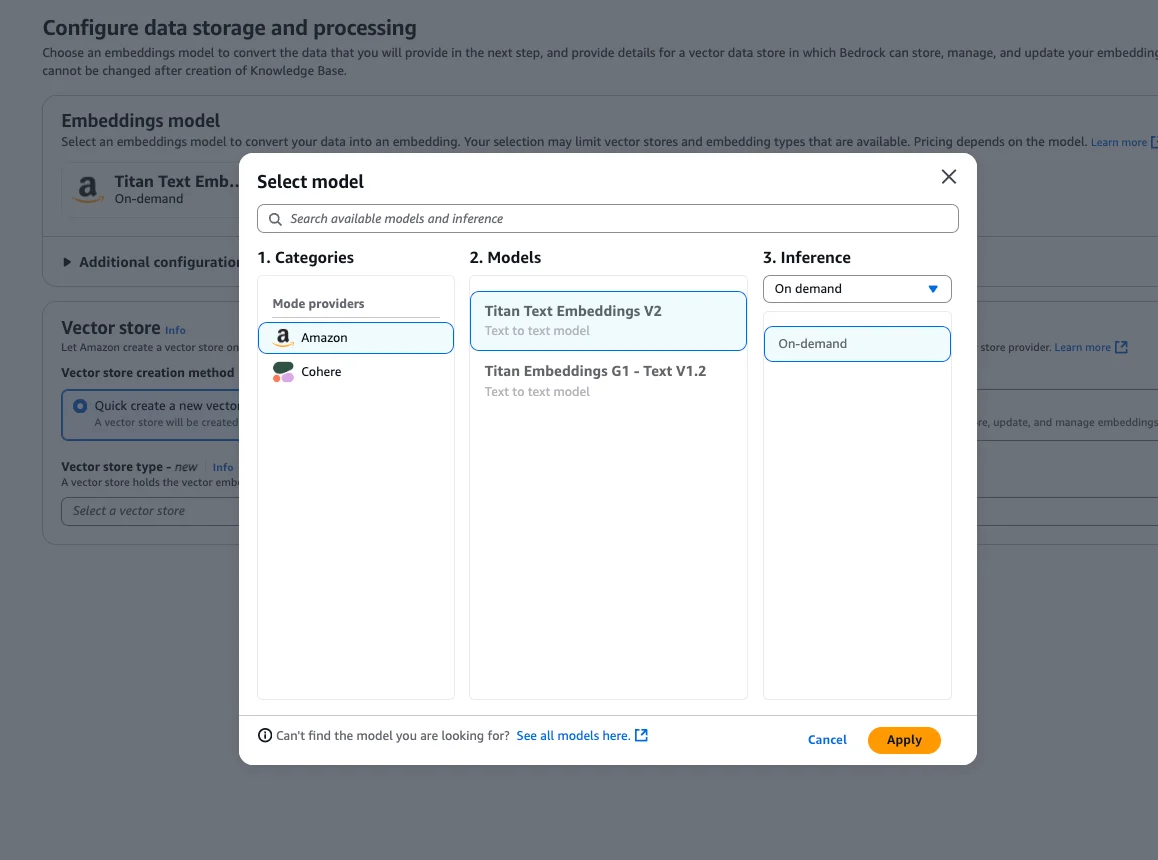
We use fixed-size chunking to keep it simple. But for our example it would also make sense to use hierarchical chunking, because our markdown posts have a hierarchy (think of the table of contents). Again, to keep it simple we stick to fixed-size chunking for now. We use max tokens 2000, and overlap percentage of 10%. Step 4 - Select Model & Vector StoreNext, we need to select a model. You can use any model you've activated in AWS.
We go with the "Titan Text Embeddings V2":
Then, we need to select a vector store. 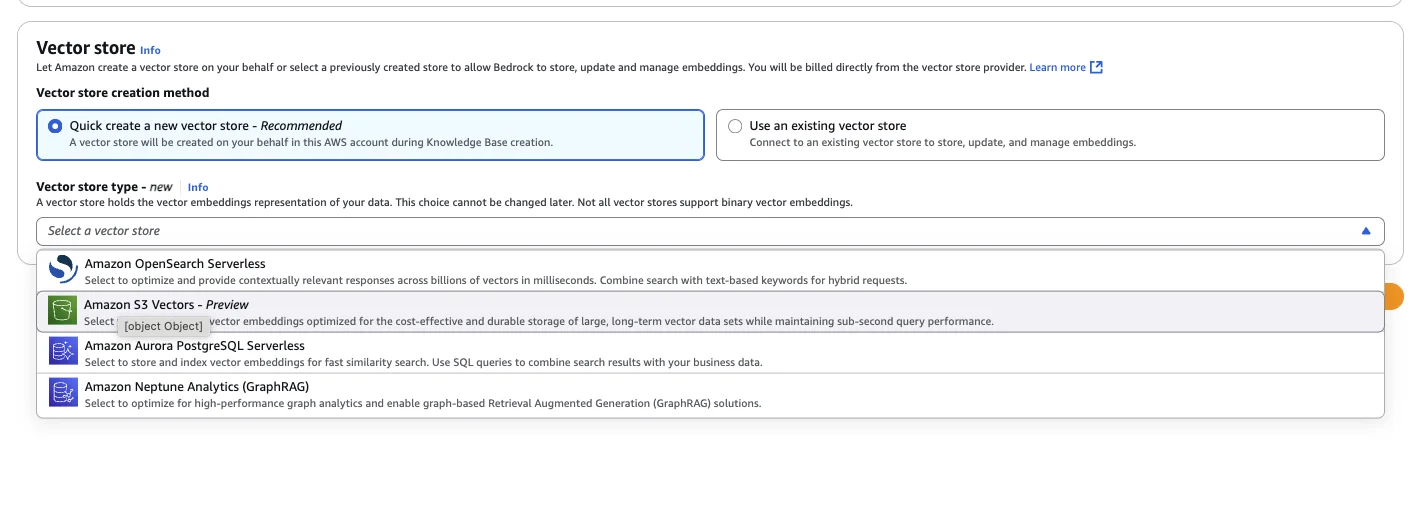
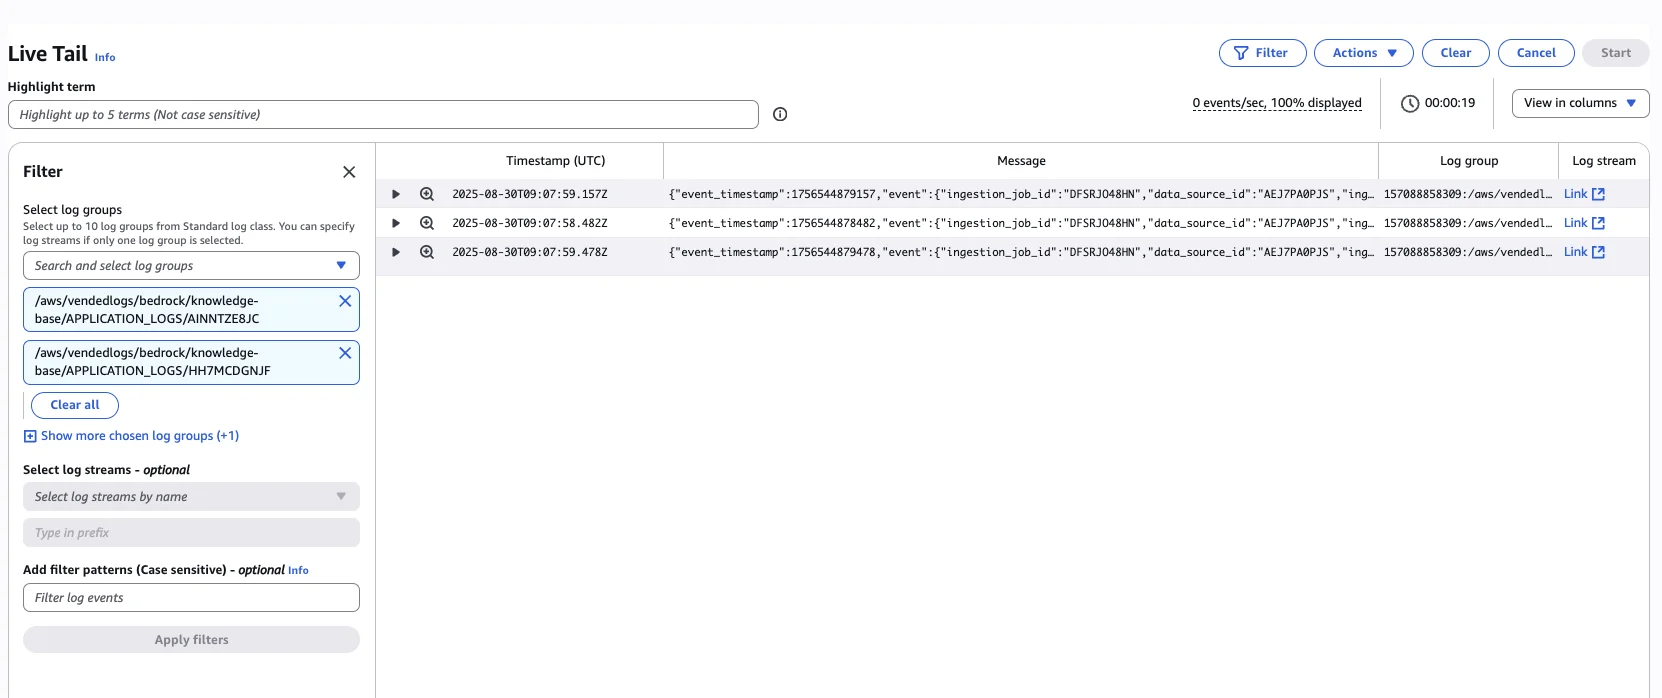
We select S3 as a vector store. Be aware that this service is still in preview! If you have production workloads, I would not recommend using it. Then click next & "Create Knowledge Base". Step 5 - Sync Your Content to Your Knowledge BaseOnce your knowledge base is created, you need to initiate a sync. Go to your data source and click on "Start Sync". 
Once you start it, you can see how your data is slowly synchronized to the vector store. The whole magic is happening within the sync step. You can also watch your sync progress using CloudWatch Live Tail:
Step 6 - Test your Knowledge Base with BedrockOkay, our knowledge base is now created. Let's test it. Open up your Bedrock Knowledge Base and click on "Test Knowledge Base": 
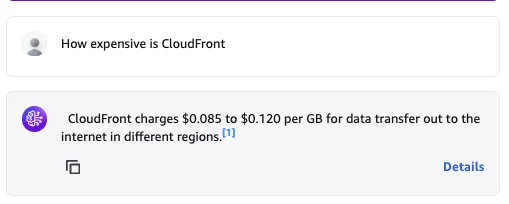
A new page opens. Select the option "Retrieval only: data sources". This won't feed the responses into an LLM again. It will only give you your data sources based on your query. Now, I am asking, for example: 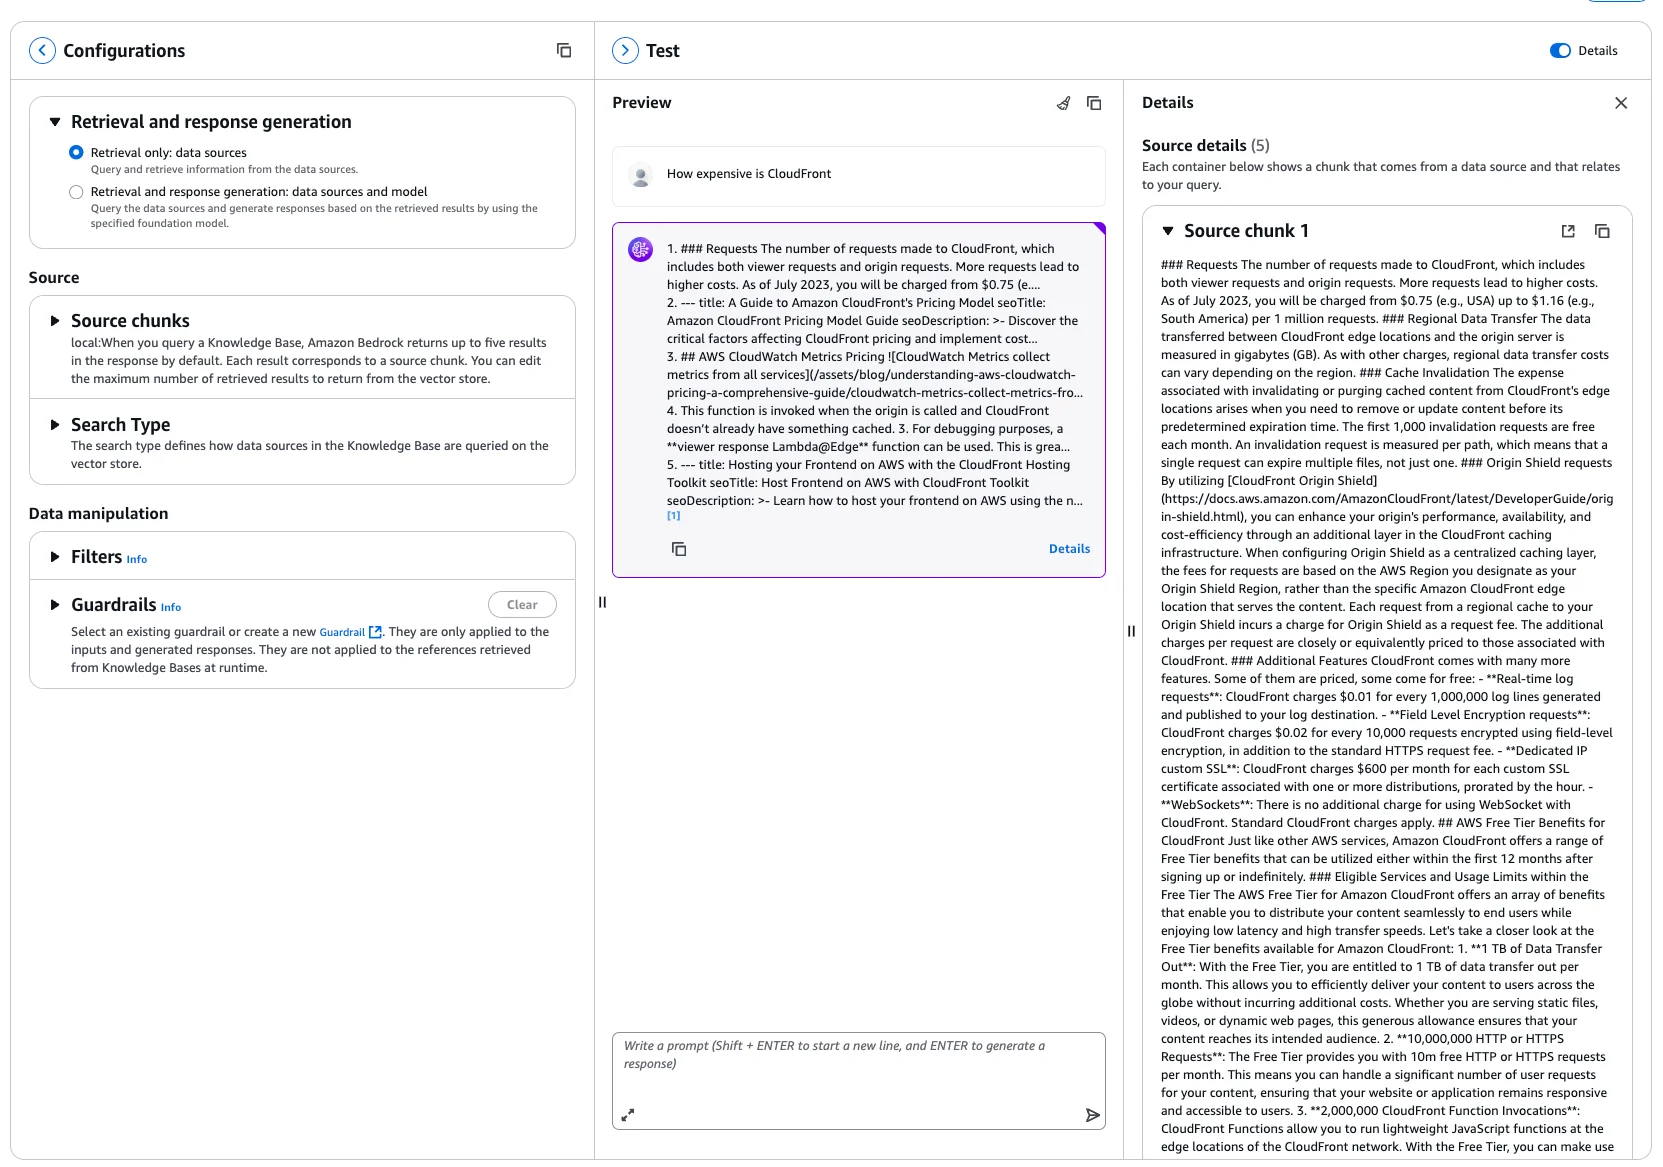
It then returns with 5 chunks from the article CloudFront Pricing. If we change the option to "Retrieval and response generation: data sources and model", it will even go one step further and feed it into the LLM you select.
The same request then results in a much nicer output:
And this is the actual beauty of it. You now get a reply with a source attached to it. Metadata You probably ask yourself now, "Why did we add all of the metadata to each post?" First of all, in the source chunks you can see this metadata as well. This helps you figure out which post, service, etc. But you can also use the metadata to filter your vector sources. For example, based on your query, which service you want to access. You could filter all of your posts already to give only chunks of the correct services to the LLM. There are many more additions and improvements. We keep those for other posts 😊 Step 7 - Generate Related Posts and Store Them in JSONNow, just the last step is missing: Actually generating related posts.
There are many "architectural" decisions on how to do that. We went with a pretty simple one. My idea was to create one JSON file in my repository called
JSON
Keep it Simple and Cheap There are many other opportunities for doing this which are probably a bit more flexible. But since we are just a two-dev team and our blog posts are saved locally in a repository, we thought this is the simplest and most cost-effective solution. We use Next.js on the frontend. At build time, we regenerate this array if files have changed. And only then do we need to call the Bedrock API and pay. This also keeps the blog post page very fast without any loading indicators. It is just HTML which lies in a CloudFront CDN cache somewhere. Script to generate related posts The script for creating that JSON was a bit back and forth. Not all posts have related posts, but we still want to show them. So what we did is the following: 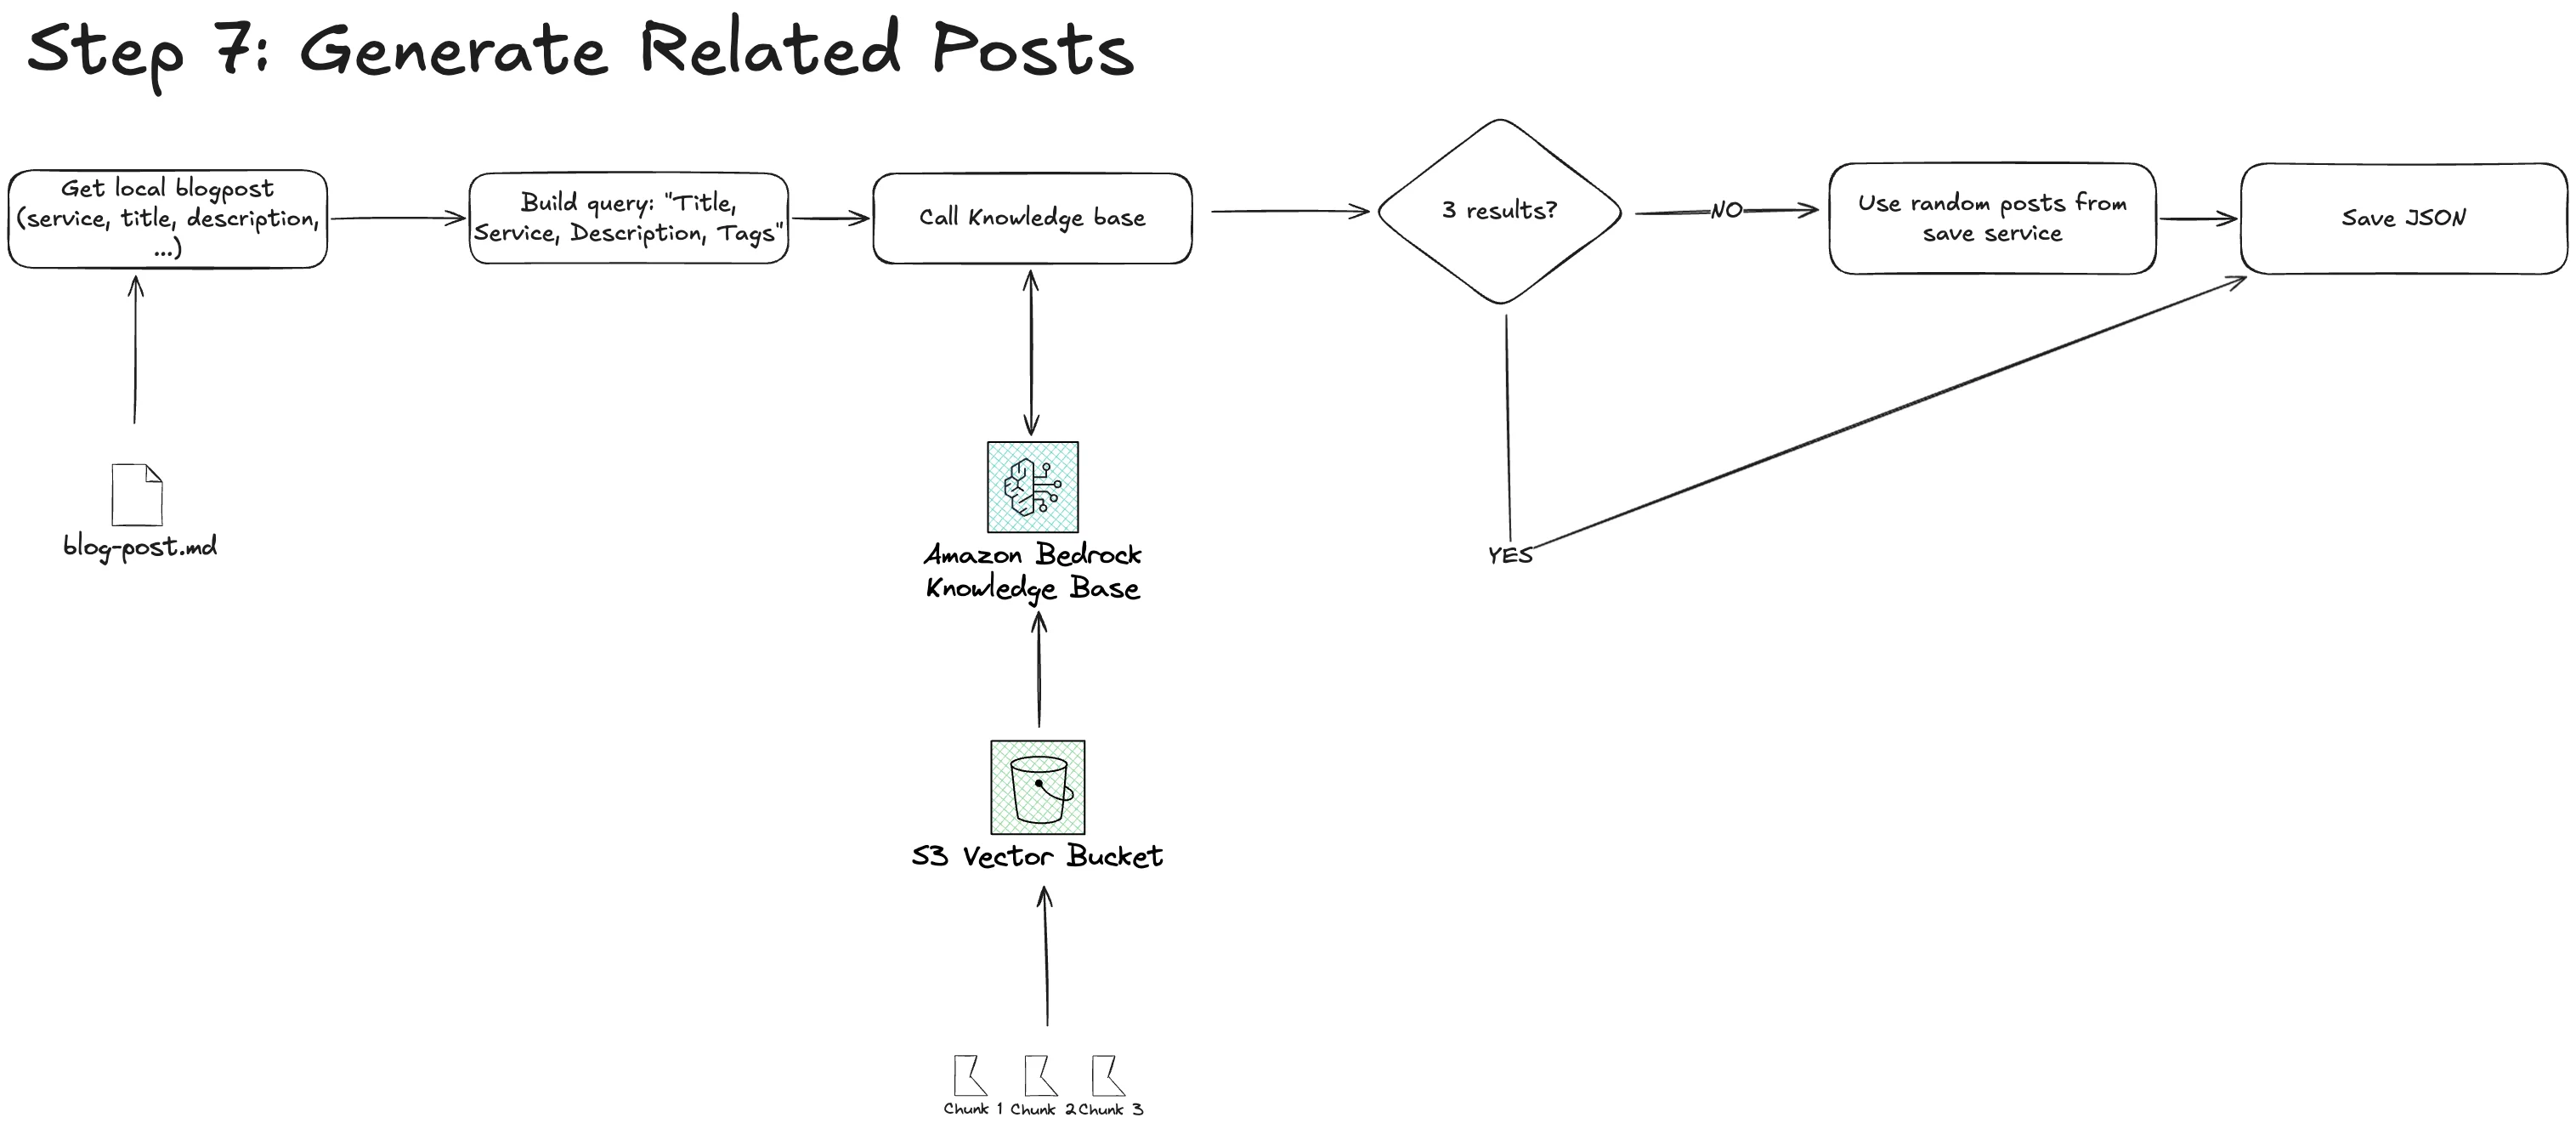
Improve Your Knowledge Base with Chunking, Preparation, and Better QueriesThis is it! We have quite some room for improvement. We also save the results while generating related posts to see how many matches we have. And this is what we saw:
JSON
That means we only have 1.4 related posts per actual query. And even 30 posts without any related post. What we could improve:
With AI products, but also with every product, we are developing in an iterative way. That means don't try to have it perfect from the beginning. Execute it end to end and improve from there. SummaryThat's it for this newsletter! We're now using Bedrock and the new S3 Vectors to power a Related Posts section on every AWS Fundamentals Blog article so you can discover more content. What do you think about this tweak – excited to check out related posts? See you soon 👋🏽 Sandro & Tobias |
 The first thing we need is our actual content. We use our
AWS for the Real World
We teach AWS for the real world - not for certifications. Join more than 10,500 developers learning how to build real-world applications on AWS.
AWS FOR THE REAL WORLD ⏱️ Reading time: 12 minutes 🎯 Main Learning: Most of the complaints in the viral "leaving AWS" post are skill issues — but egress pricing is a fair hit. 📝 Blog Post Hey Reader 👋🏽Recently, a post with the title "I returned to AWS and was reminded why I left" hit 810 upvotes on Hacker News last week and went pretty viral with it.I read it twice before forming an opinion. My honest take: most of the complaints are skill issues! 🤷♂️Nevertheless, the post is well written and...
AWS FOR THE REAL WORLD ⏱️ Reading time: 10 minutes 🎯 Main Learning: Describe the agent: model, prompt, tools and AWS runs the orchestration loop behind one API call! 📝 Blog Post Hey Reader 👋🏽 If you've ever built an agent on AWS, you know the pain: glue Bedrock, Lambda, and DynamoDB together, grab LangGraph or Strands, then also own the orchestration loop, the memory layer, and your own tracing. 😅 A "simple" agent ends up with multiple layers of pain.AWS just shipped something that takes most...
AWS FOR THE REAL WORLD ⏱️ Reading time: 12 minutes 🎯 Main Learning: Wrapping a multi-account AWS org in multiple layers of guardrails, featuring SCPs, RCPs, CloudTrail and Bugdet Actions 📝 Blog Post Hey Reader 👋🏽As you hopefully know, we're really obsessed with security, observability and auditability. That's why we've carefully crafted our AWS Organization's setup. 🏗️ In this issue, we want to walk you through our most important guardrails! Including all the whats and whys. 😊 Sponsored AWS...