- ⌛ Reading time: 11.5 minutes
- 🎓 Main Learning: Host Web Applications on AWS with the CloudFront Hosting Toolkit
- 👨🏽💻 GitHub Code
- 📝 Blog Post
Hey Reader 👋🏽
Happy New Week!
I (Sandro) will attend the Serverless Days in Milano next week where Jeremy Daley will hold the keynote. I look forward to meeting many of you and the overall AWS community.
This week's newsletter is all about hosting your frontend on AWS. AWS launched a new way of deploying your frontend to it: The CloudFront Hosting Toolkit.
In this newsletter, we'll take a look at it and give you a step-by-step tutorial on how to use it for the first time. Let's go!
What is the CloudFront Hosting Toolkit?
The toolkit is a command-line interface (CLI) that sets up the required cloud infrastructure for you. It also creates a CI/CD pipeline and connects to your GitHub repository.
Typically, if you want to deploy your frontend to AWS you will see AWS Amplify a lot. Amplify is a good way to get started. It abstracts the infrastructure needed away from you.
The launch blog post of the CloudFront Hosting Toolkit mentions the following:
While developers love how easy it is to get started [...] customers tell us they need the flexibility to take control over various parts of their application’s infrastructure to further customize.
This and the following sentences made us believe why the toolkit was built in the first place. Amplify abstracts CloudFront and the CICD pipeline away from you. While this is often very good to get started quickly you will see its limitations after some time.
The CloudFront Hosting Toolkit can be used as a separate piece of your infrastructure.
In essence, the toolkit wants to enable developers to host their static pages and single-page applications (👋🏽 React) on AWS. It also wants to give devs an easy git-push deployment model. This is what other vendors such as Vercel, Netlify, fly.io, etc. offer as well.
Let's host a frontend Step-By-Step
Let's host a frontend together on AWS. First of all, make sure you have your profile exported. We assume your credentials are exported to your default profile (we recommend Leapp here again). Now you need to do the following:
Install the CloudFront Hosting Toolkit
npm install -g @aws/cloudfront-hosting-toolkit
First, we install the toolkit globally. Unfortunately, we didn't find a brew formula yet for that so we went with npm global installs.
Create a new vite React app:
Let's create a new React app. Next.js is famous for being a bit hard to deploy. That is why we go with a plain Vite React app in this example.
pnpm create vite
Initialise CloudFront Hosting Toolkit
cloudfront-hosting-toolkit init
In this step, we initialize the toolkit. This will create the local build files. While initializing your toolkit you need to answer several questions:
- GitHub Repository URL: This is needed to establish a connection to GitHub
- Deployment branch
- Framework Selection: React
- Custom domain: No
After that, you can check the file cloudfront-hosting-toolkit/cloudfront-hosting-toolkit-build.yml. For us, it looks like this:
version: 0.2
phases:
build:
commands:
- npx npm install
- npx npm run build
- cd build # Change to cd dist
- echo aws s3 cp ./ s3://$DEST_BUCKET_NAME/$CODEBUILD_RESOLVED_SOURCE_VERSION/ --recursive #don't change this line
- aws s3 cp ./ s3://$DEST_BUCKET_NAME/$CODEBUILD_RESOLVED_SOURCE_VERSION/ --recursive #don't change this line
This is a typical frontend deployment script. You can change that to follow your desired behavior. One thing we need to update here is the cd build step. Once Vite builds it creates a dist folder.
Deploy
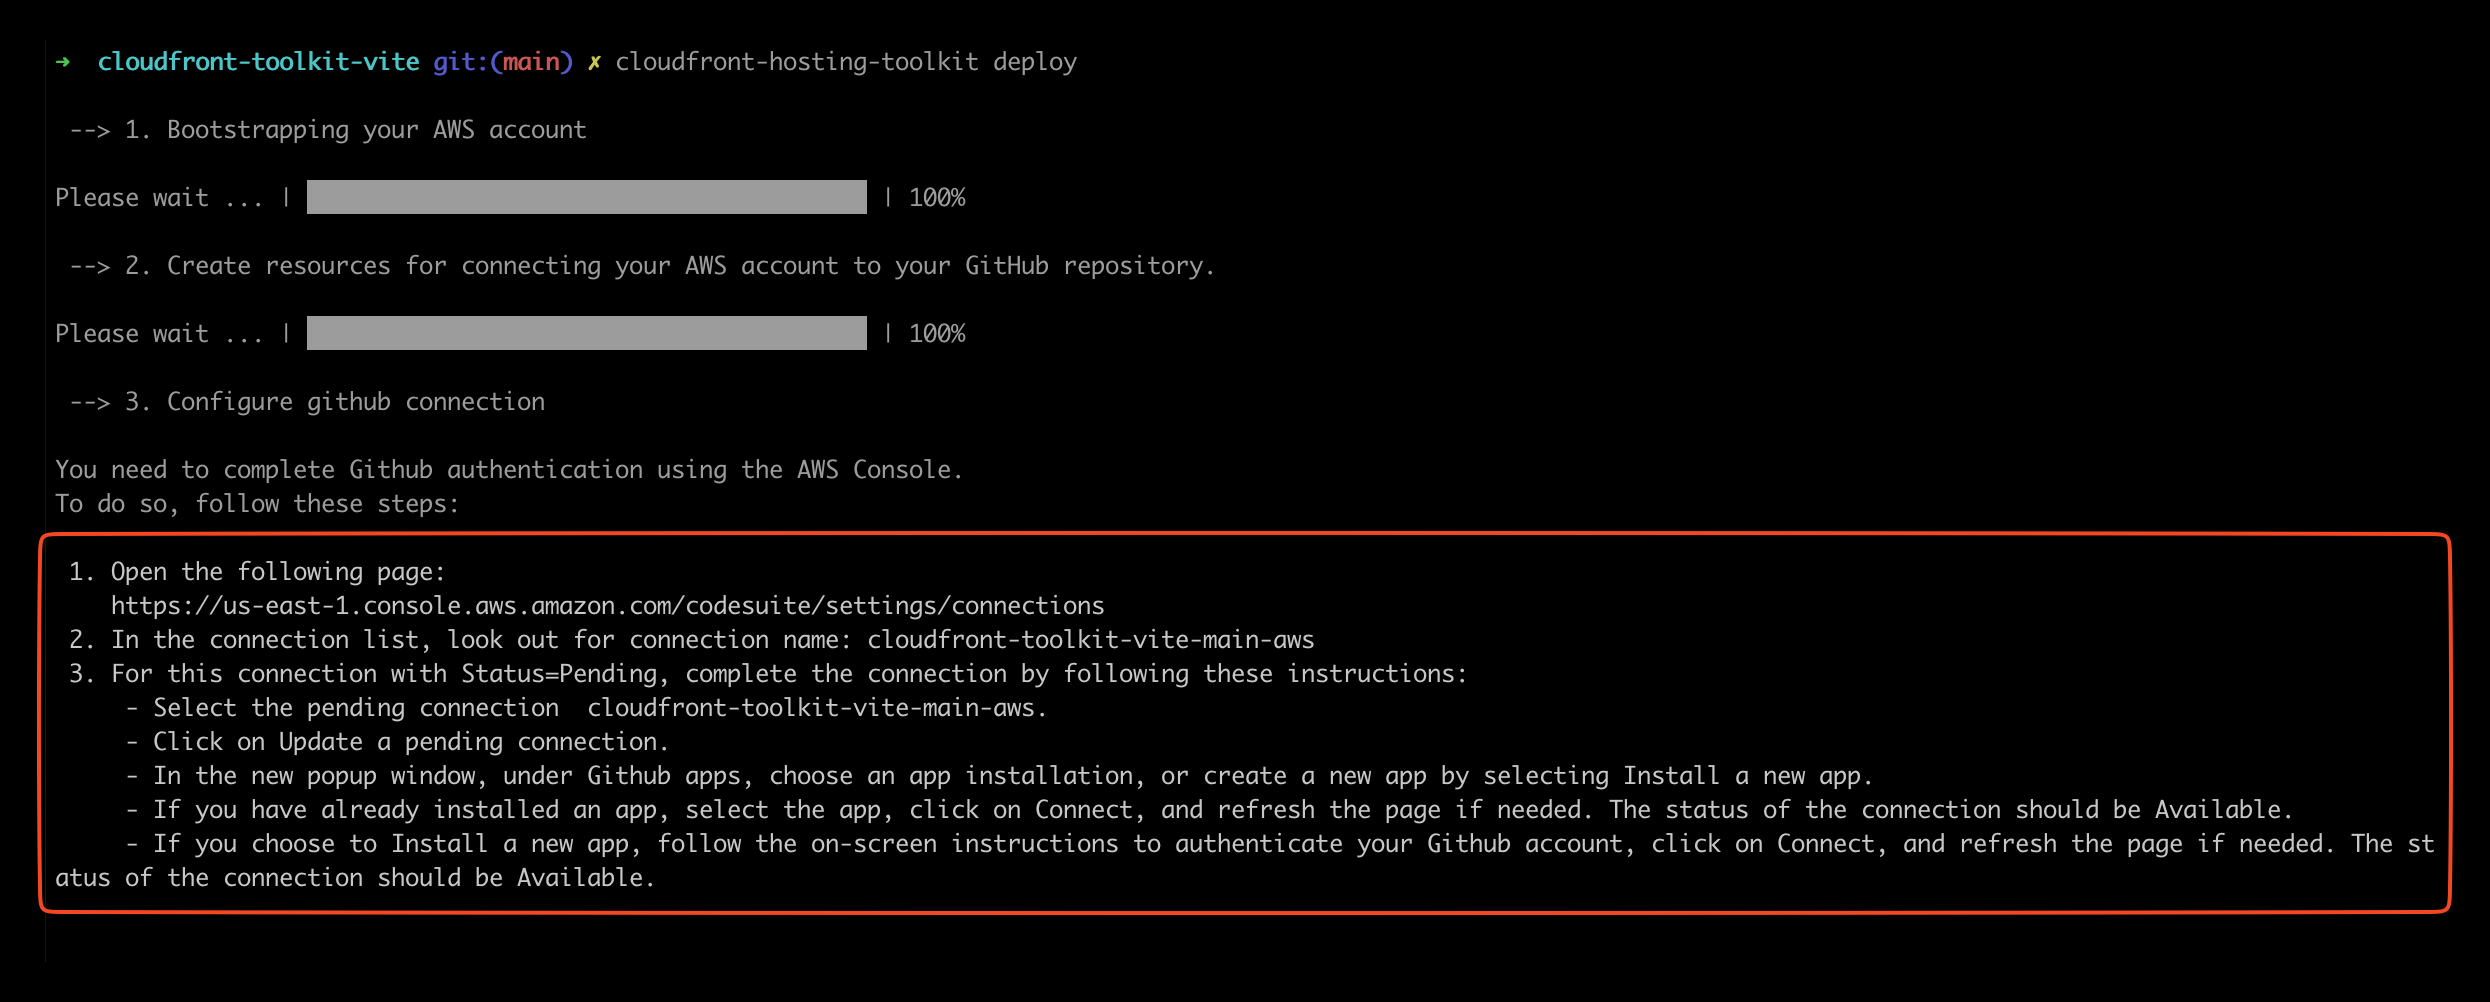
cloudfront-hosting-toolkit deploy
Next, let's deploy it. The CLI will automatically:
- Bootstrap your AWS Account: Similar to a CDK bootstrap your AWS account will be prepared
- Create a GitHub connection between AWS and GitHub
- Configure GitHub
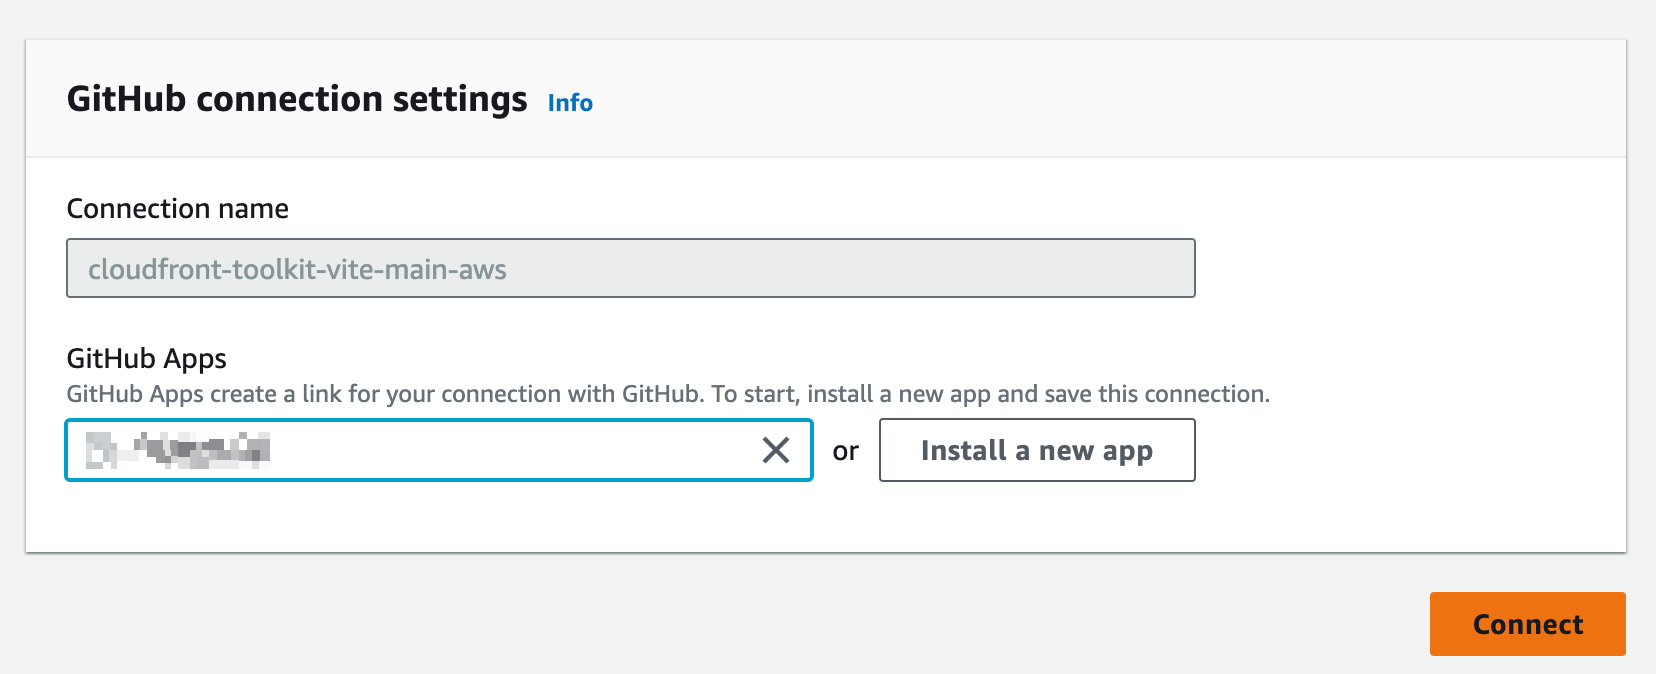
The third step is where you need to take action again. The CLI prompts a link where you can authorize GitHub & AWS.
Click on the link, find the connection in the state Pending, and authorize it by clicking on Update Pending Connection. You will then be asked to map your GitHub app to this connection. Make sure to give permissions to the repository you want to deploy from.
After you do that your connection should have the state Available. Now you can go back to your CLI and type ok.
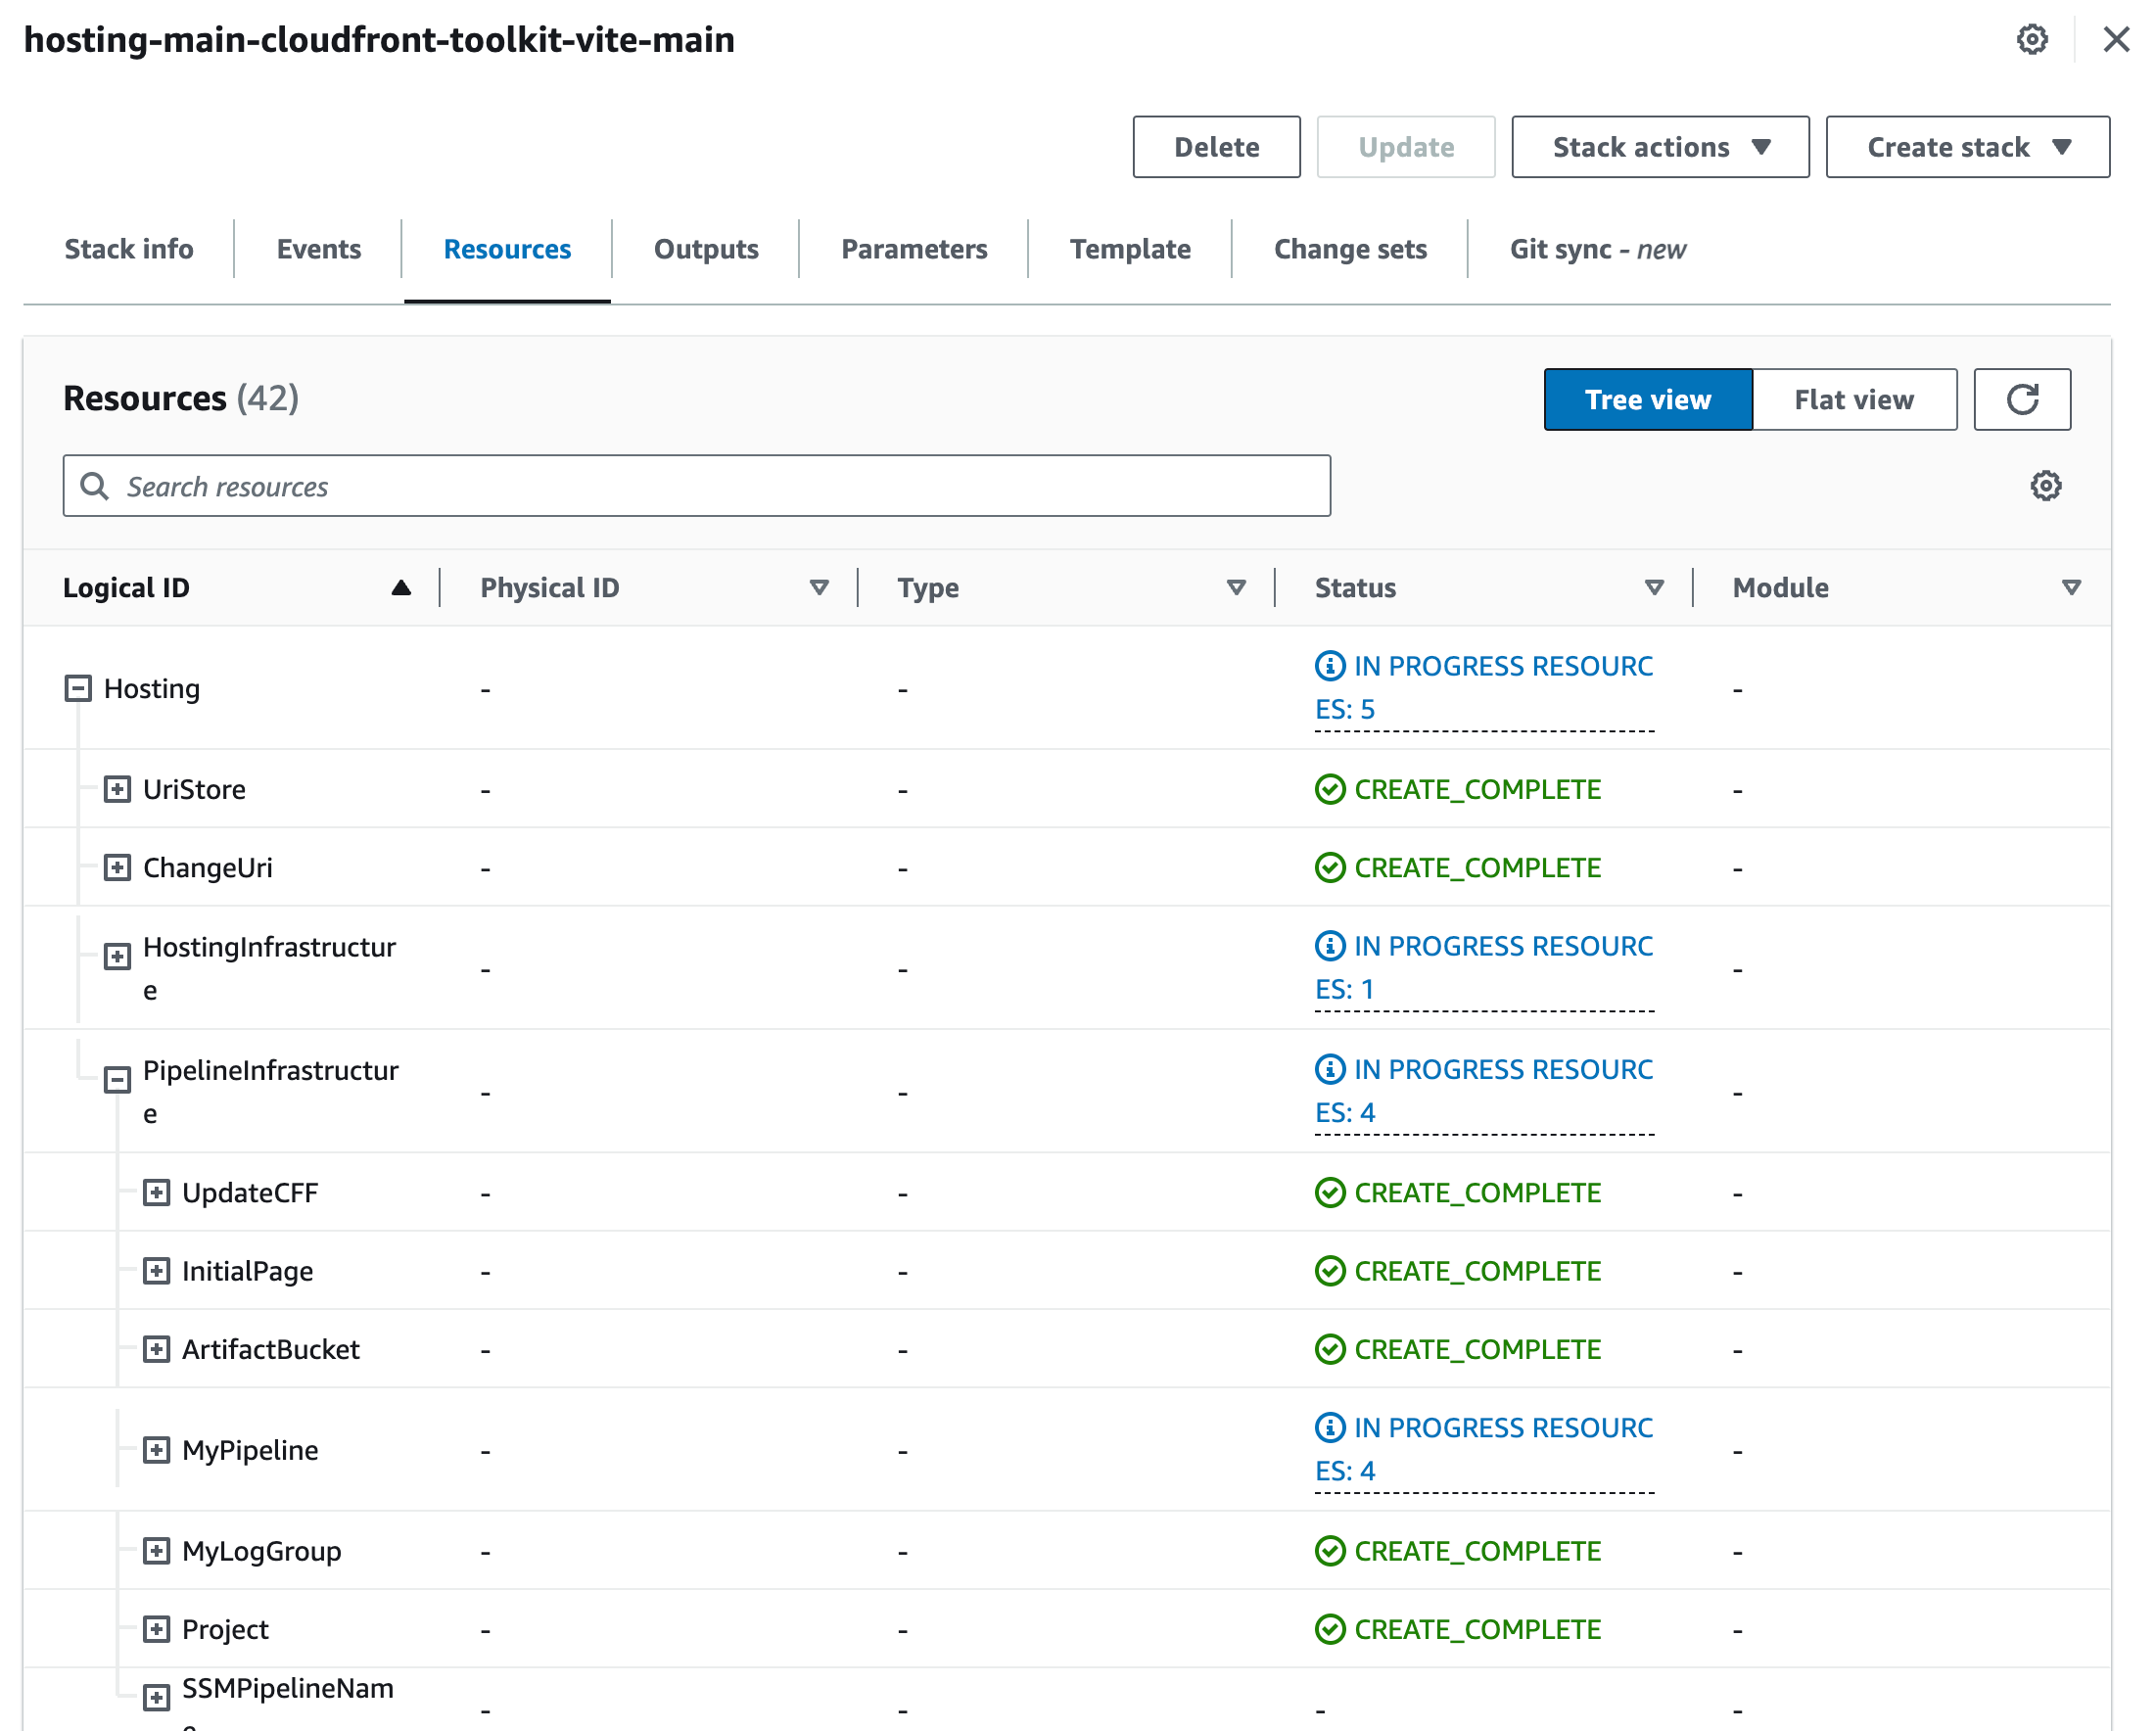
The fourth step in the deployment process is to provision all the infrastructure that is required to host your frontend.
That's it! Now you can find your URL in CloudFront and your web application is deployed:
Infrastructure that will be provisioned
Now, let's come to the interesting part. The launch blog post claims that developers want to have more flexibility when it comes to managing the infrastructure provisioned. But which infrastructure is actually provisioned?
The easiest way to find which infrastructure was provisioned is to check CloudFormation. Head over to CloudFormation, and select your stack. For us, it was the stack hosting-main-cloudfront-toolkit-vite-main. Click on the tab Resources. You now have a tree-like overview of all resources that were provisioned within this stack.
The launch blog post also comes with an architecture screenshot:
This is quite a bit. The architecture exists out of:
- S3 Buckets to hold your HTML/JS files
- CodeBuild for automated CI/CD
- AWS Step Functions for updating the key/value store
- Route53 for DNS and custom domains
- CloudFront as a CDN
- Certificate Manager for HTTPS
- Lambda & Lambda at Edge for various things like routing and updating the key/value store
I was amazed by some of the defaults that were given. Especially the Lambda functions and Step Functions. Let's look into some of the parts of the architecture.
S3 & CloudFront
S3 holds all of your HTML and JS files. This is called the origin. CloudFront is the Content Delivery Network (CDN). It uses S3 as your origin. CloudFront is responsible for serving the files all over the world. It also caches the files on the edge locations to make sure you have a fast performance.
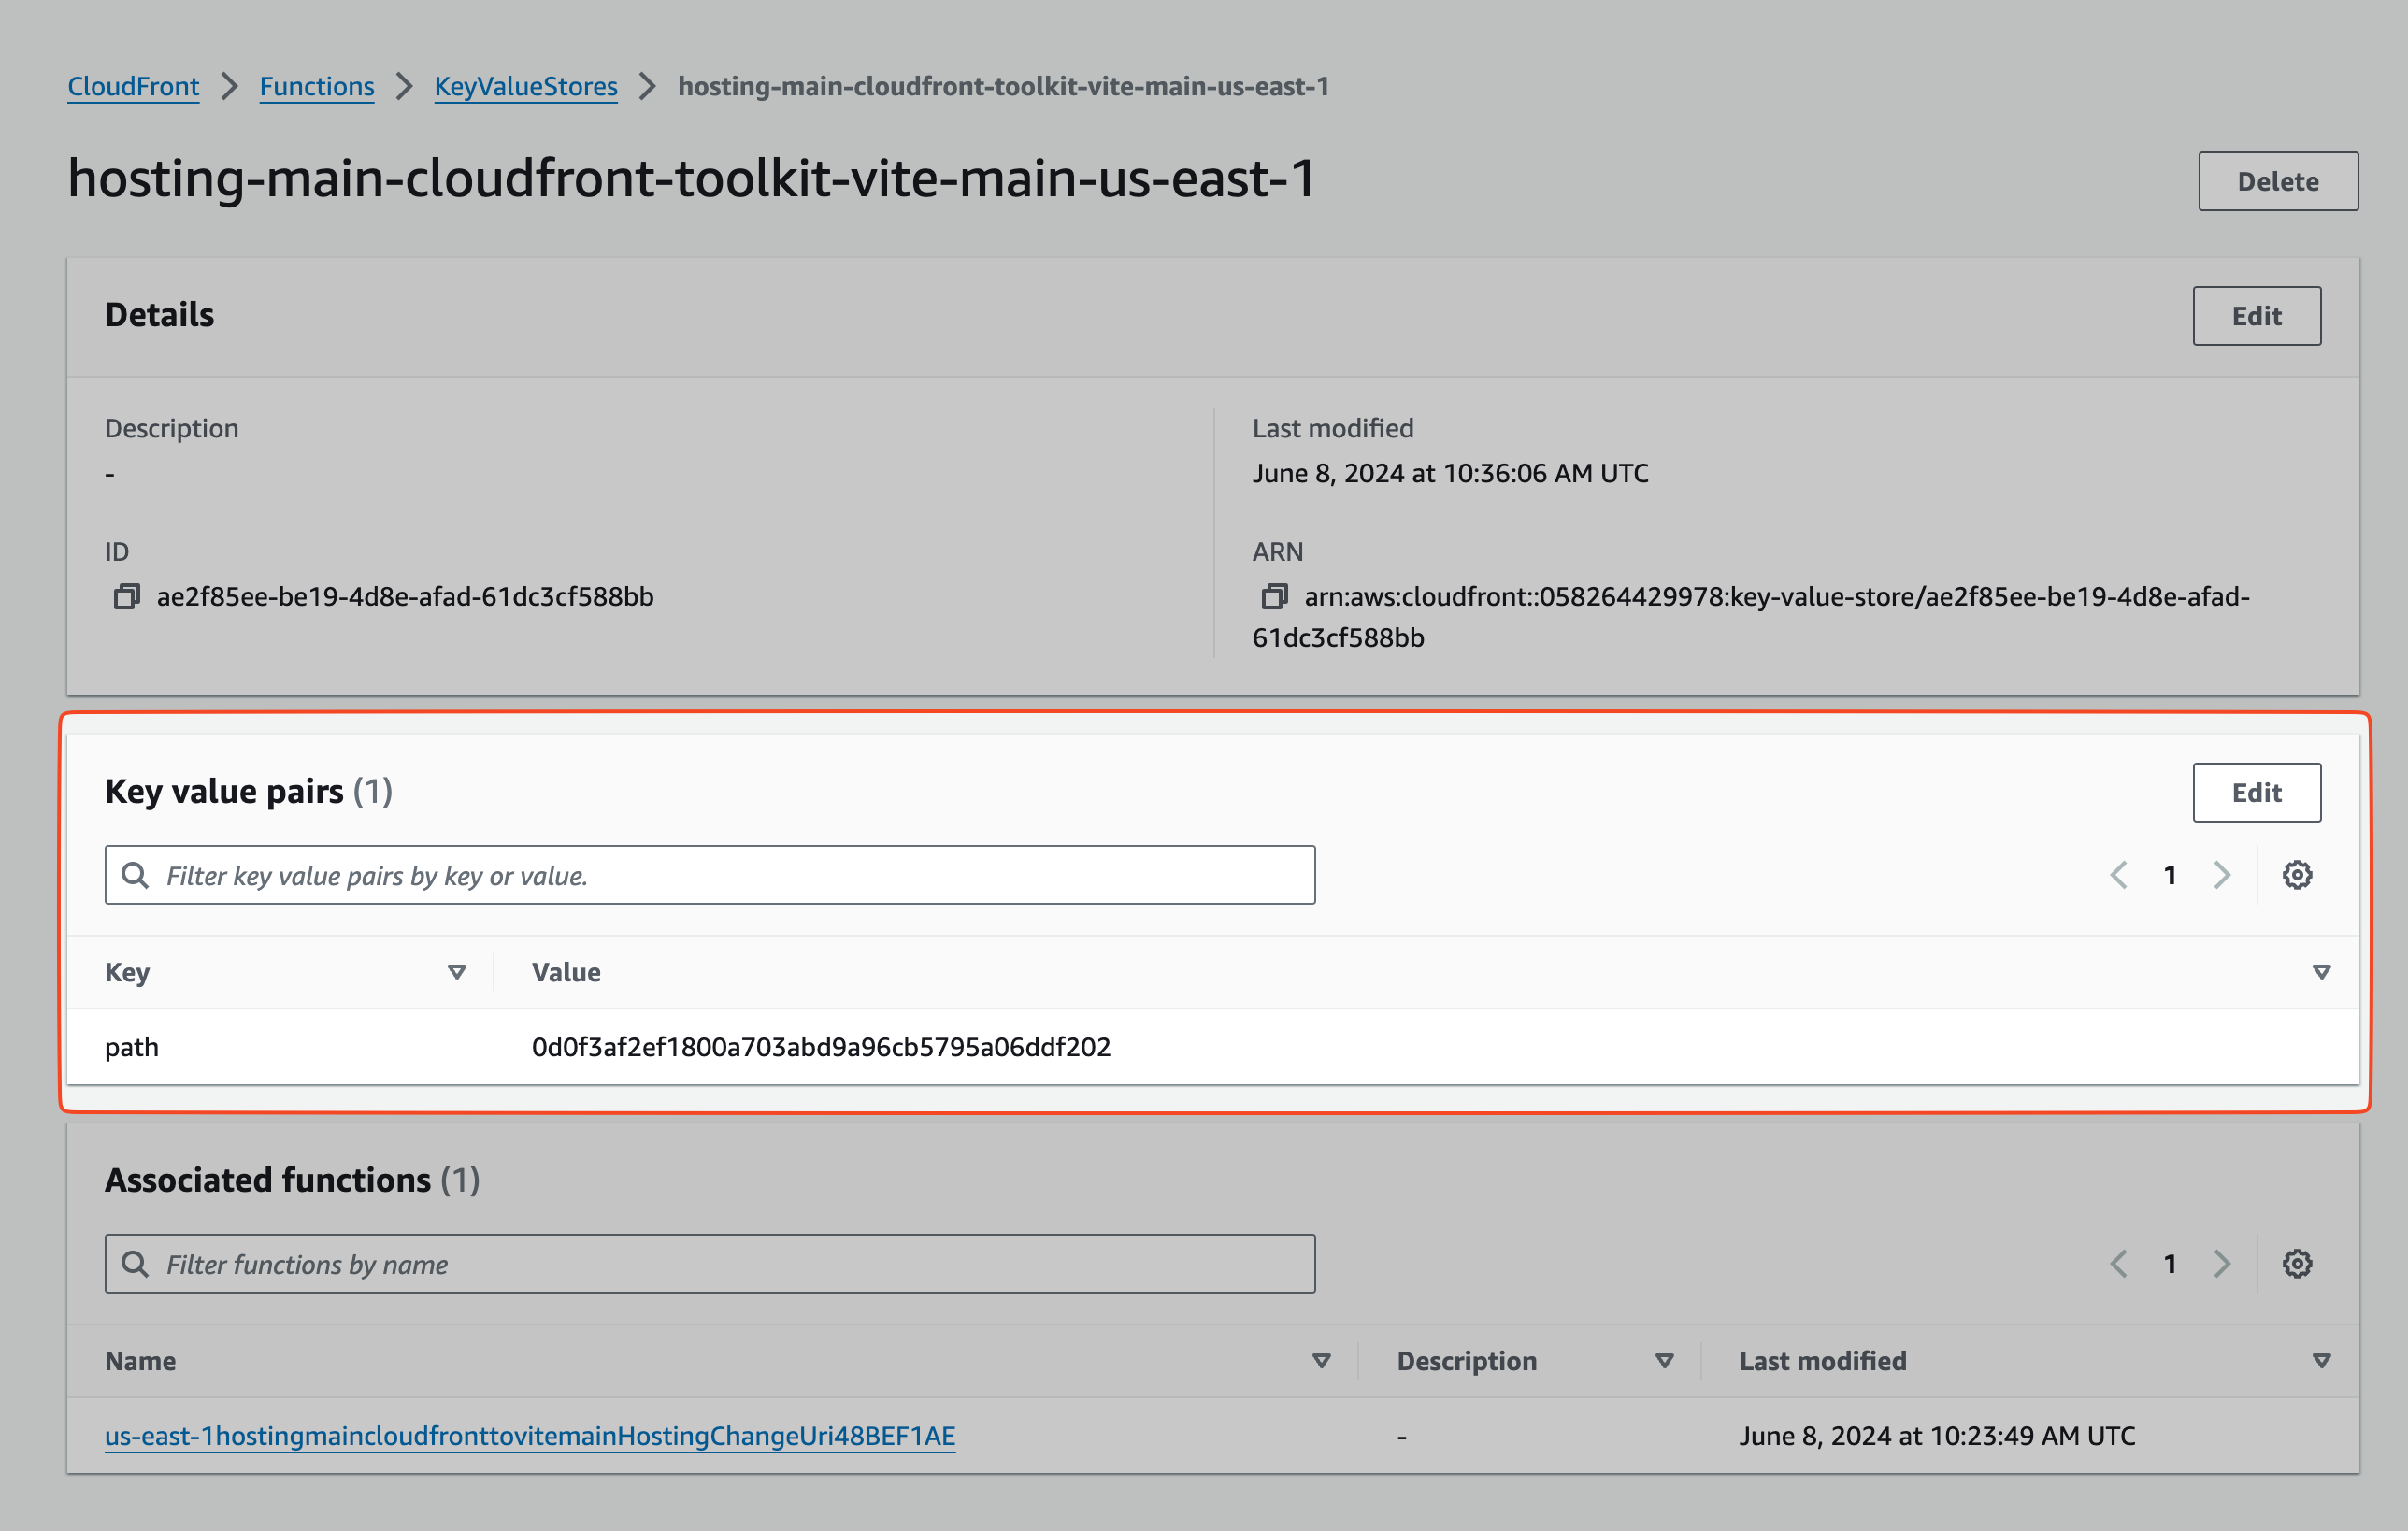
Key/Value (KV) Store
CloudFront provisioned a key/value store. The key/value store in CloudFront allows you to read data from edge locations all over the world. CloudFront functions can access those stores. But why do we have one by default?
This is explained in this sequence diagram:
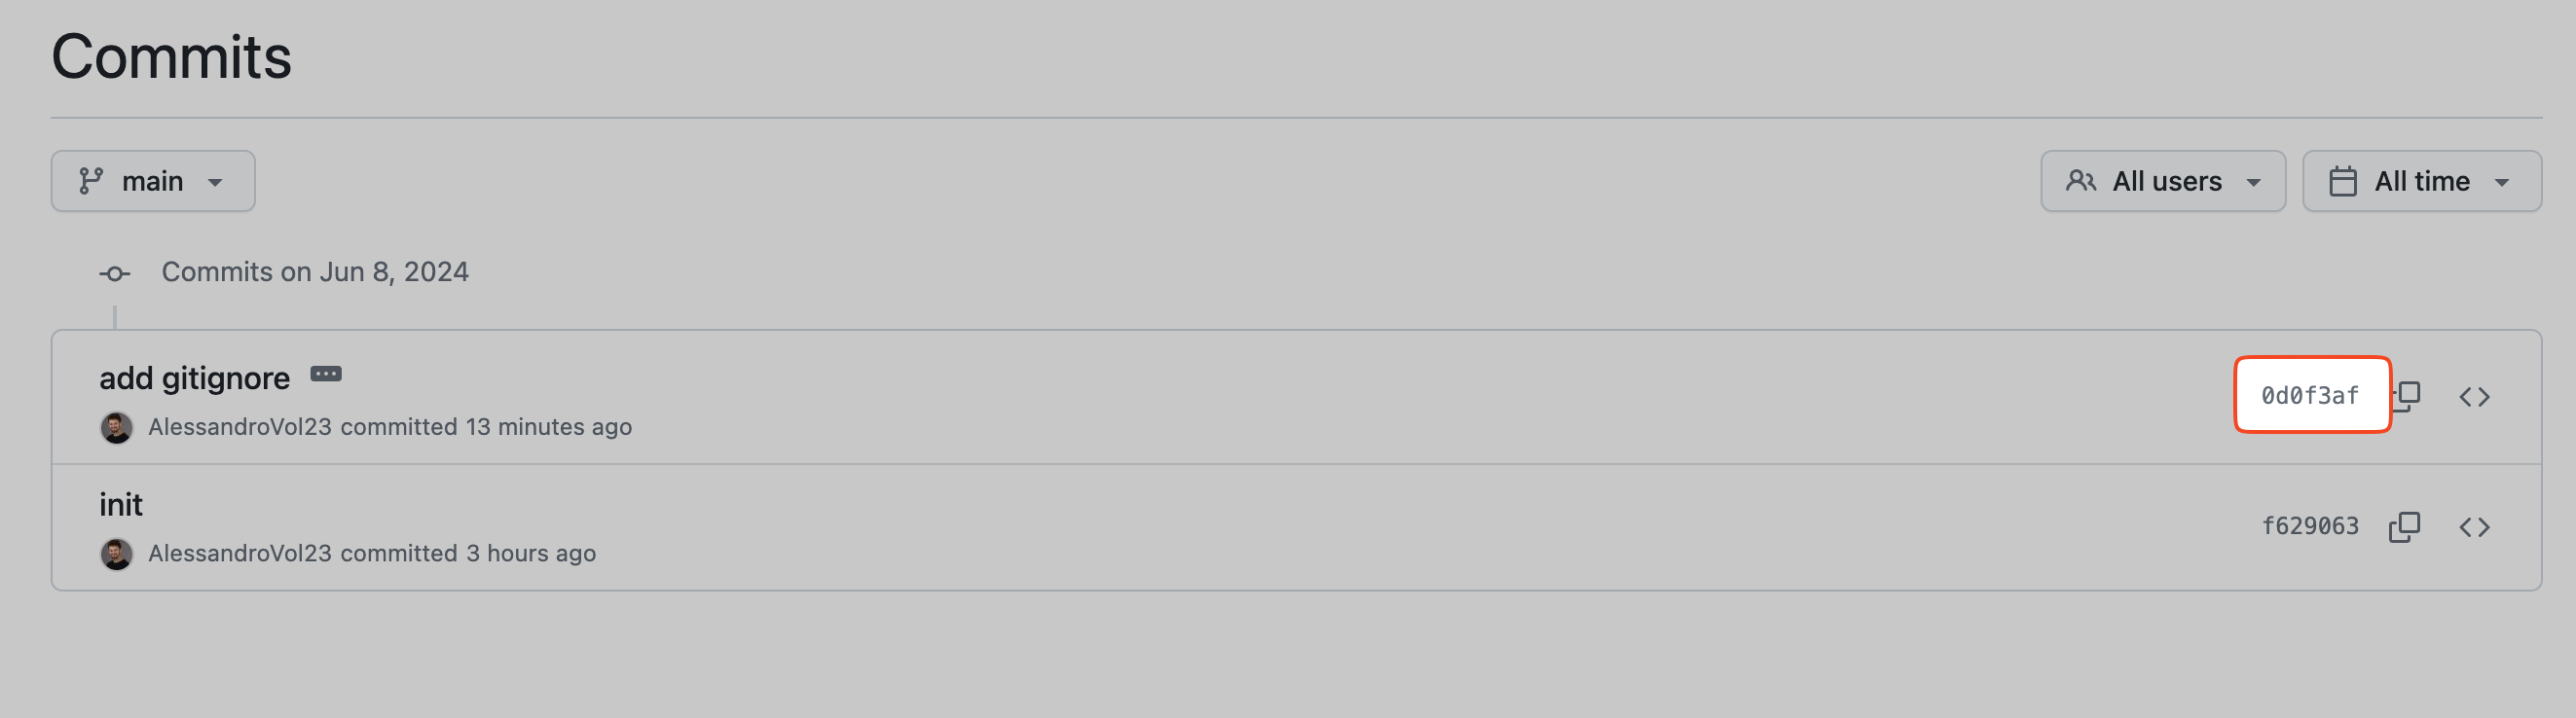
On each CloudFront request, an Edge Function is executed. This function reads from the KV store. The KV store holds the latest commit ID which is used as a build ID here.
For example, our latest commit was this one.
The commit ID is: 0d0f3af2ef1800a703abd9a96cb5795a06ddf202
If we check the KV store we can see the same ID:
This ensures that always the latest version of the build is accessed.
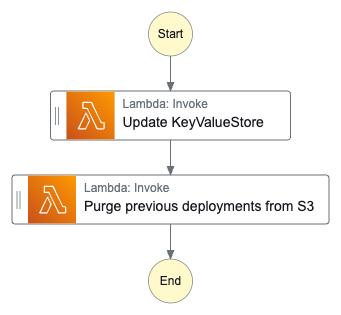
Step Function to Update key/value store
The toolkit also adds a Step Function which exists of two Lambda functions.
The Step Function updates the key/value store and purges all previous deployments from S3. One thing that could be improved: Here could also be an express function be used.
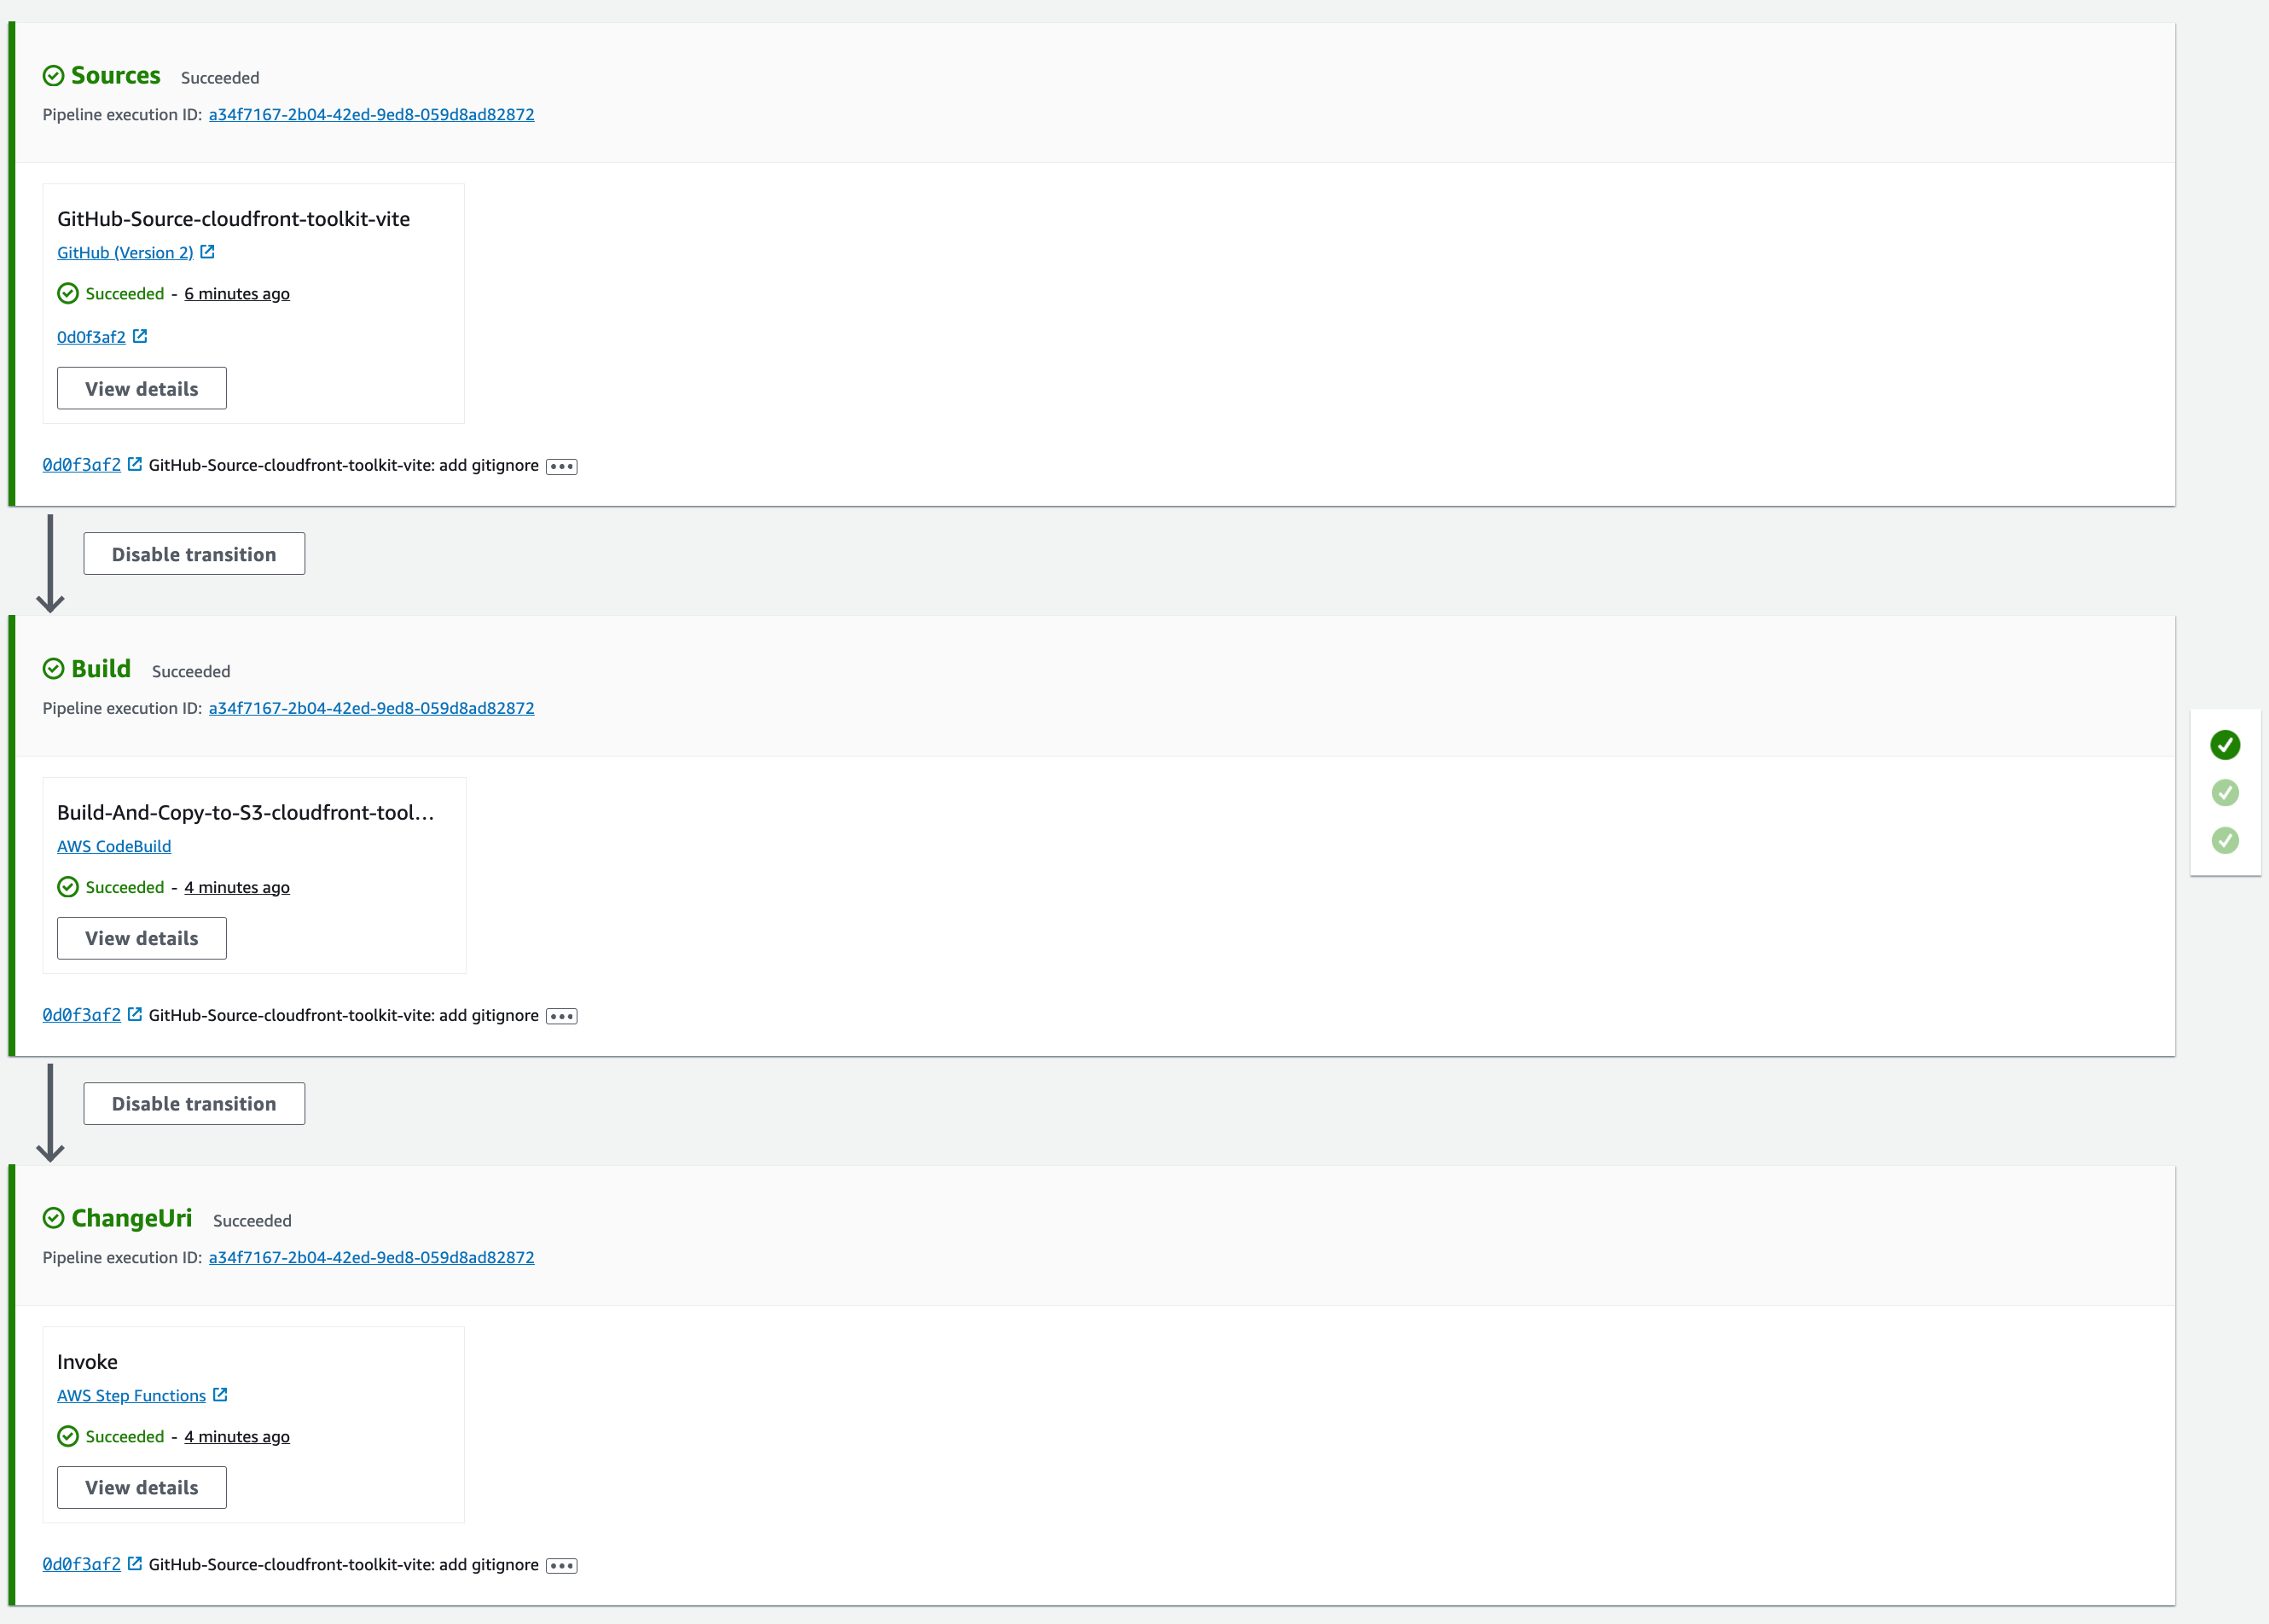
CI/CD Pipeline
The pipeline has the following stages:
- Source: Clone the GitHub repository
- Build: Build the static output and put it into the S3 bucket
- ChangeUri: This invokes the step function
Summary & Honest Opinion
The CloudFront Hosting Toolkit for us is somewhat of an L3 CDK construct (it also actually is one 😉). It provisions infrastructure for you with some sensible defaults. It allows you to tweak and enhance this infrastructure without being stuck in Amplify's world of doing things.
But it again has some gotchas. For this post, we tried to use a default template and deploy it to AWS. This didn't even work out.
We made two approaches: The first one was with the latest Next.JS framework and the standard blog template. This one didn't work out since the CLI command next export doesn't exist anymore but it is in the build script. In my opinion, this could have been simply tested out and the CLI could have checked that.
If it offers Next.js support and it mentions it in the launch blog post it should be battle-tested at least with the default repository in my opinion.
The second approach was with Vite & React. While we had a few gotchas (the GitHub app didn't have the right permissions and the build directory was wrong) it worked out smoothly in the end.
I think AWS wants to offer a better and easier approach to host frontend deployments which we greatly appreciate. It probably wants to compete with companies like Vercel which we're totally up for. But these simple gotchas let people believe that AWS often doesn't see the whole developer experience.
We still think this is a great addition. Especially, since we can use it as an L3 construct in CDK. That means we can easily integrate it into our infrastructure. And have access to all pieces of the infrastructure at the same time.
That's it
I hope we can give you good insights into the newly launched tool. Give it a try and let us know what you think of it.
Best,
Sandro & Tobi ✌🏽
|
|
Tobi & Sandro
our goal is to simplify AWS & Cloud Learning for everybody. You don't need expensive certifications to build on AWS!
|