in this newsletter, we’ll explore how to build a serverless chat application that uses Amazon Bedrock and the OpenAI API.
We’ll use SST (Serverless Stack) to develop and deploy the application on AWS, featuring Next.JS for the frontend and DynamoDB and Lambda for backend services.
The project involves creating a chat application that not only allows real-time communication but also uses contextual notes to enrich conversations.
This means that you can create and store notes that will be passed as a context to your chat. The model can reference and utilize previously stored information to make conversations more useful.
The integration of Amazon Bedrock provides access to several different AI models (e.g. Titan from Amazon or Claude from Anthropic) that can analyze and understand the context. Additionally, we’ll also integrate with the OpenAI API.
Technologies used
The technologies we’re using are 100% serverless and pay-per-use. Everything will be deployed to AWS and won’t result in any hourly costs:
Amazon Bedrock & OpenAI API: Used for processing and understanding natural language within the chat.
Serverless Stack (SST): A framework that (drastically) simplifies building and deploying serverless applications on AWS.
Next.JS: A React framework that enables server-side rendering and static website generation to build the frontend.
DynamoDB: A fast and flexible NoSQL database service for all document-based applications.
Lambda: A compute service that lets you run code without provisioning or managing servers.
Architecture of the Application
The architecture of the application is very simple and straightforward:
Frontend: A simple web app built with Next.JS. It interacts with the backend through API Gateway, fetching data from and sending data to the AWS Lambda functions.
Backend: Several AWS Lambda functions that handle our business logic, including simple authentication (via an API key), message processing, and interactions with the database and our external APIs from Amazon Bedrock and OpenAI.
Data Storage: Uses DynamoDB to store chat messages and notes.
All infrastructure is managed by SST, meaning we can write highly abstracted Infrastructure-as-Code and SST does the heavy lifting.
Necessary Prerequisites and Installations
Before diving into the development of our app, there are a few prerequisites that need to be addressed:
node/pnpm: As this is a TypeScript/Node.js project, we need to have Node.js installed. As we’re a fan of pnpm, we’ll use it instead of npm.
AWS Account: You will need an active AWS account to deploy our application that uses various services such as AWS Lambda, DynamoDB, and API Gateway. If you don’t already have an account, you can easily sign up at AWS. Disclaimer: A credit card is required.
AWS CLI: Make sure to install the AWS CLI (following the instructions on the official AWS CLI page or use a package manager like homebrew) and configure it with your credentials. For this you’ll need an IAM (or Identity Center) user with the AdministratorAccess policy attached (or more minimal, fine-grained permissions that still cover the services and actions we use). 💡 Please do not use your root user. Afterward, please configure the AWS CLI with your credentials and default region (us-east-1) by using aws configure.
OpenAI API Access: Access to the OpenAI API is required. You must apply for access at OpenAI, and once approved, obtain an API key that will allow you to make requests to the OpenAI API.
Amazon Bedrock Access: Since this application uses Amazon Bedrock, we also need to request access to different models from Amazon, Anthropic, or Mistral. This can be done on the Model Access page from Bedrock.
Introduction to SST
Serverless Stack (SST) is an open-source framework designed to make it easier to build serverless applications with AWS.
SST extends AWS CloudFormation (currently on the way of replacing CloudFormation with Pulumi via SST Ion) and provides a higher level of abstraction to simplify the deployment and management of serverless resources.
It also includes a local development environment that allows you to test your serverless applications locally, using live AWS cloud resources.
One of the key features of SST is the Live Lambda Development. It enables you to work with your Lambda functions locally while directly interacting with deployed resources in AWS. This is done by proxying your calls to your real Lambda functions to your local code! 🪄
Another significant feature of SST is the SST Console, a powerful web-based dashboard that provides real-time insight into your app. It enhances the development experience by offering a unified view of your resources and logs. It also allows you to quickly debug issues directly from the console by invoking functions and seeing log outputs. In combination with the live development mode for Lambda, this is a game changer for developers. This is definitely the case for us at least!
Setting Up Our Project
With the necessary tools installed and the first knowledge about SST, it’s time to dive into setting up our project.
This stage is critical as it lays the foundation for the entire application, from backend to frontend.
We’ll start by creating a new SST project, defining APIs using AWS Lambda for our compute, and setting up a new frontend application using NextJS.
💡 You can check out our repository, or follow along, but we won’t cover every detail in this guide.
If you want to learn how to get started with SST, please read the full blog article.
Integrating with Amazon Bedrock
Integrating Amazon Bedrock into our serverless chat application opens up sophisticated capabilities for handling natural language processing.
Let’s see how we get access to Amazon Bedrock’s supported models, set up the necessary permissions for our AWS Lambda functions, and to use these models by submitting prompts.
Getting Access to Bedrock’s Supported Models
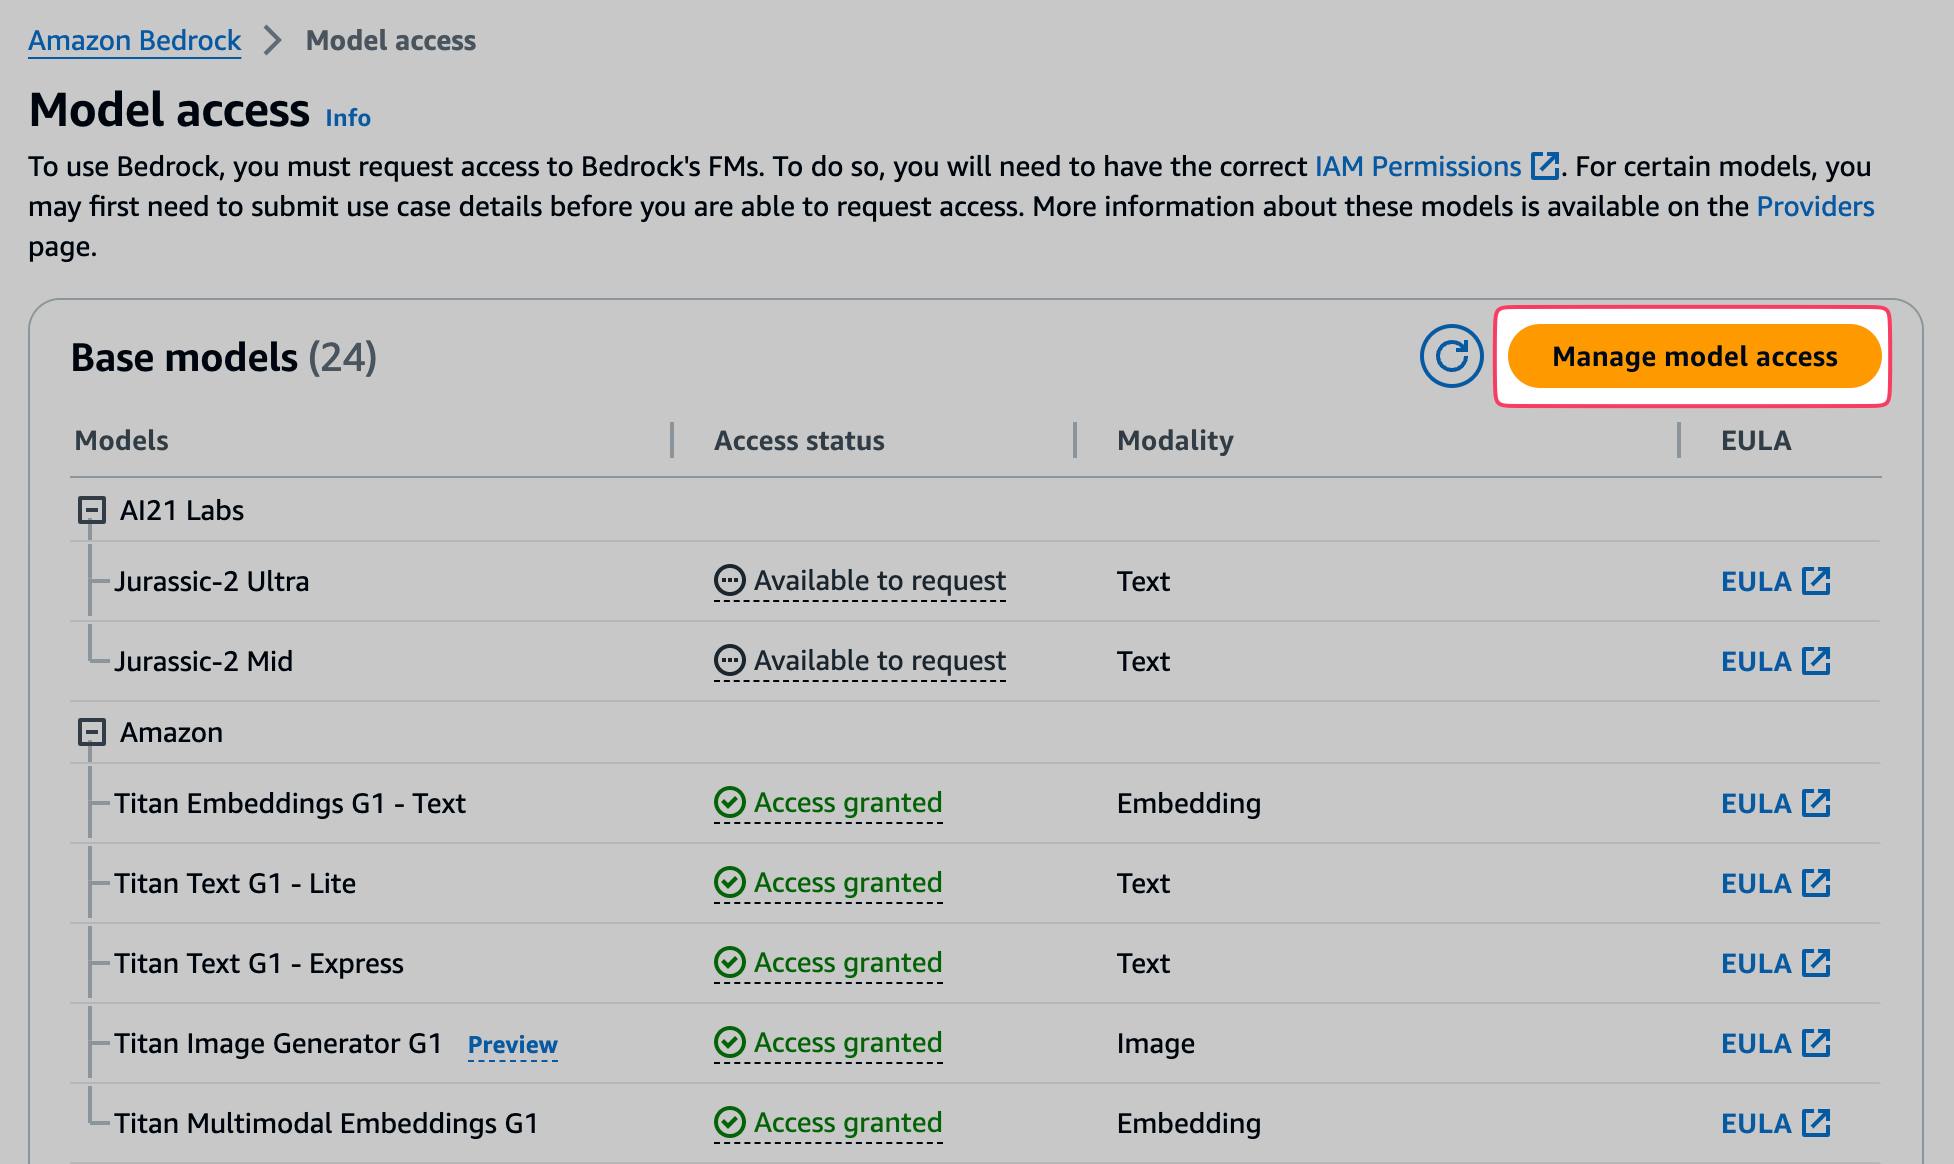
As mentioned earlier, you must request access to Bedrock’s supported models via its Model access overview page. Some models do not require you to provide use-case details (e.g. Amazon Titan or the models by Mistral) and are approved immediately. Others require you to fill out what you want to use the model for (e.g. Claude from Anthropic).
By clicking on Managed model access, you can check the necessary boxes for the models you want to use. For our example application, we’ll work with the previously named models from Amazon, Mistral, and Anthropic. But feel free to request access to other models.
Once the request is granted, you’ll see a green Access granted flag on the corresponding model.
Setting up Permissions for Our Functions
When we’re working with Bedrock’s models, we’re solely charged for the usage that we generate. We don’t have hourly costs just for requesting access to the models.
What we need to do so that our functions are able to access the Bedrock API is to set up the necessary IAM permissions. We’ve already seen this in our SST API definition previously, but let’s do a quick recap:
We need:
bedrock:ListFoundationModels to list the available models and
bedrock:InvokeModel to actually submit prompts to a specific model
When we look into our function code that submits the prompts, we can see that we need slightly different payloads for the different models.
The general request structure always looks the same just the body differs based on the model provider:
The requirements of the models can be found in the AWS documentation. As an example, the Amazon Titan text models require the following body:
In the inputText, we need to clarify which text is coming from us (prefixed with User: and which text was generated by the model (prefixed with Assistant:. This is required as we want to keep the context for the following messages (we’ll always provide all of the previous messages in our requests).
Also, for each of the providers, we’ll have a slightly difference response payload. For example, Amazon Titan will return the results in the response object in the path .results.[0].outputText while Claude from Anthropic will use .completion.
Speaking to the OpenAI API
Amazon Bedrock doesn’t allow us to talk to the most famous model out there: GPT3.5 and GPT4. That’s why we’ll also integrate with the OpenAI API.
Setting up our API Key
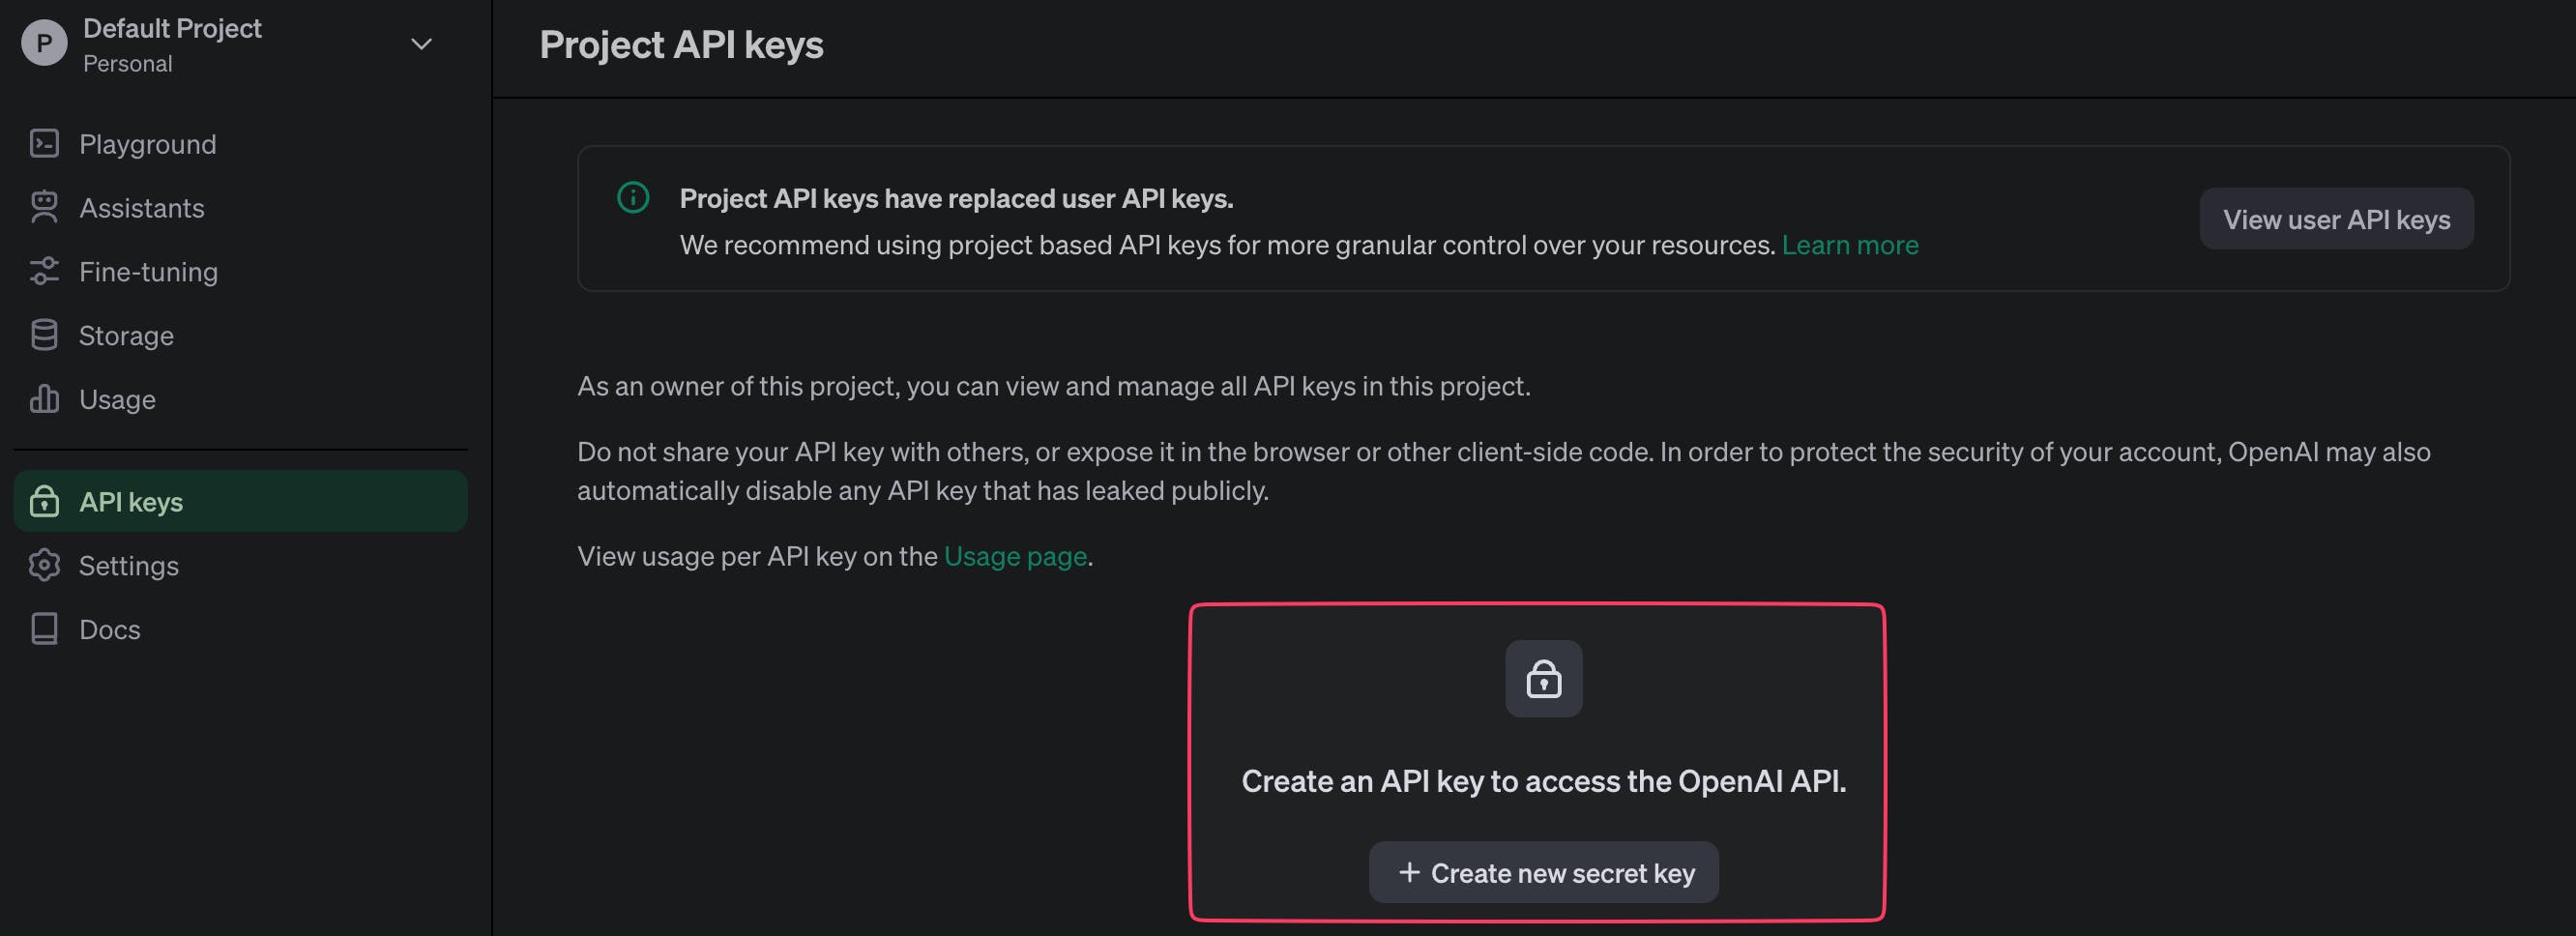
As previously mentioned, for this we need to get access to the OpenAI API. For this, you’ll have to apply at OpenAI, and once approved, obtain an API key that will allow you to make requests to the OpenAI API.
Once approved, you can generate a new API key in the API keys tab.
Since recently you’ll also need to purchase credits in advance, as there’s no invoice-based charging anymore. Nevertheless, if you’re new to OpenAI, you’ll most likely receive a few dollars in credits to get started for free.
Afterward, you’ll need to provide the API key to SST:
SST will then store your key securely at the parameter store of the Systems Manager service.
Forwarding our Prompts to OpenAI
Now, everything is already ready to go.
That’s already it.
Building a Chat Interface
Let’s build a simple but effective interface to interact with our models.
Designing our Interface
Our frontend will consist of two important pages: the notes and the chat view.
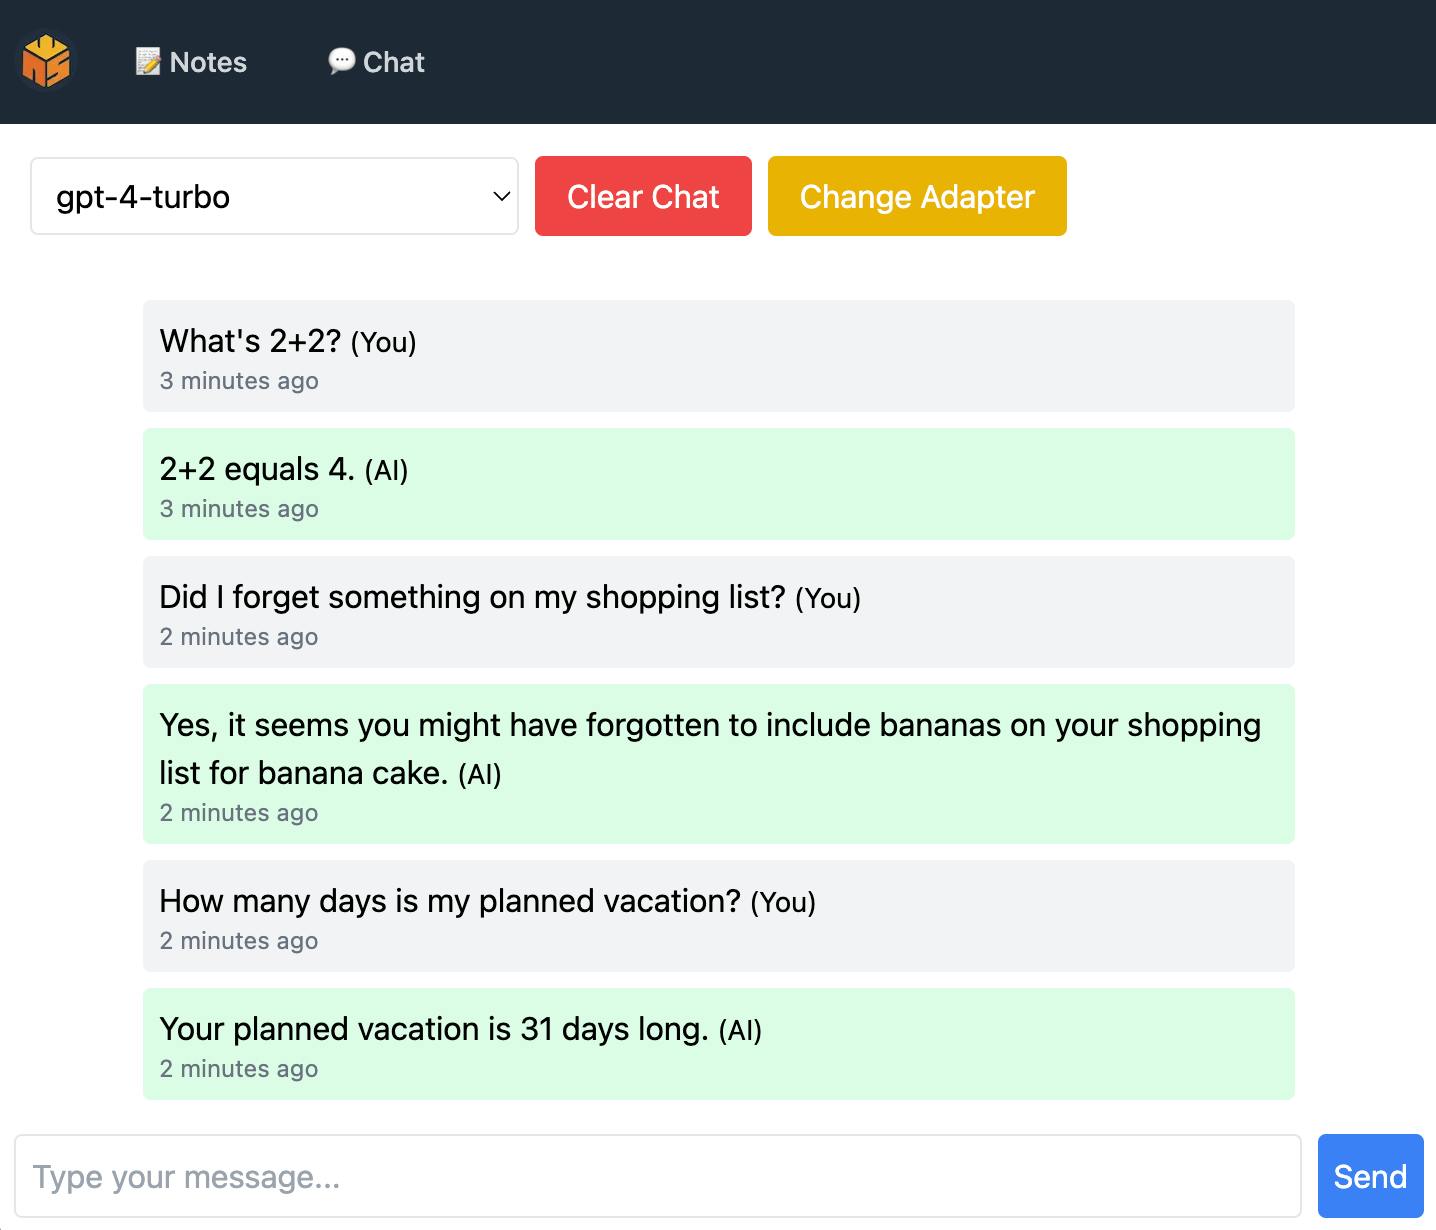
The Chat Interface is where we’ll interact with the AI models. The chat interface should prominently feature an area for messages, an input field for typing new messages, and buttons for sending messages.
Messages from us and responses from the AI should be visually distinct.
From a function perspective we need to be able to:
View messages in a conversational format.
Enter new messages through a text input.
Send messages using a send button or by pressing “Enter”.
Select between using Bedrock or OpenAI.
Select a model from one of the providers.
Clearing our previous messages to start a new chat.
So we’ll end up with only two necessary routes:
/notes for our note-taking view.
/chat for our chat with our model.
Integrating Contextual Notes
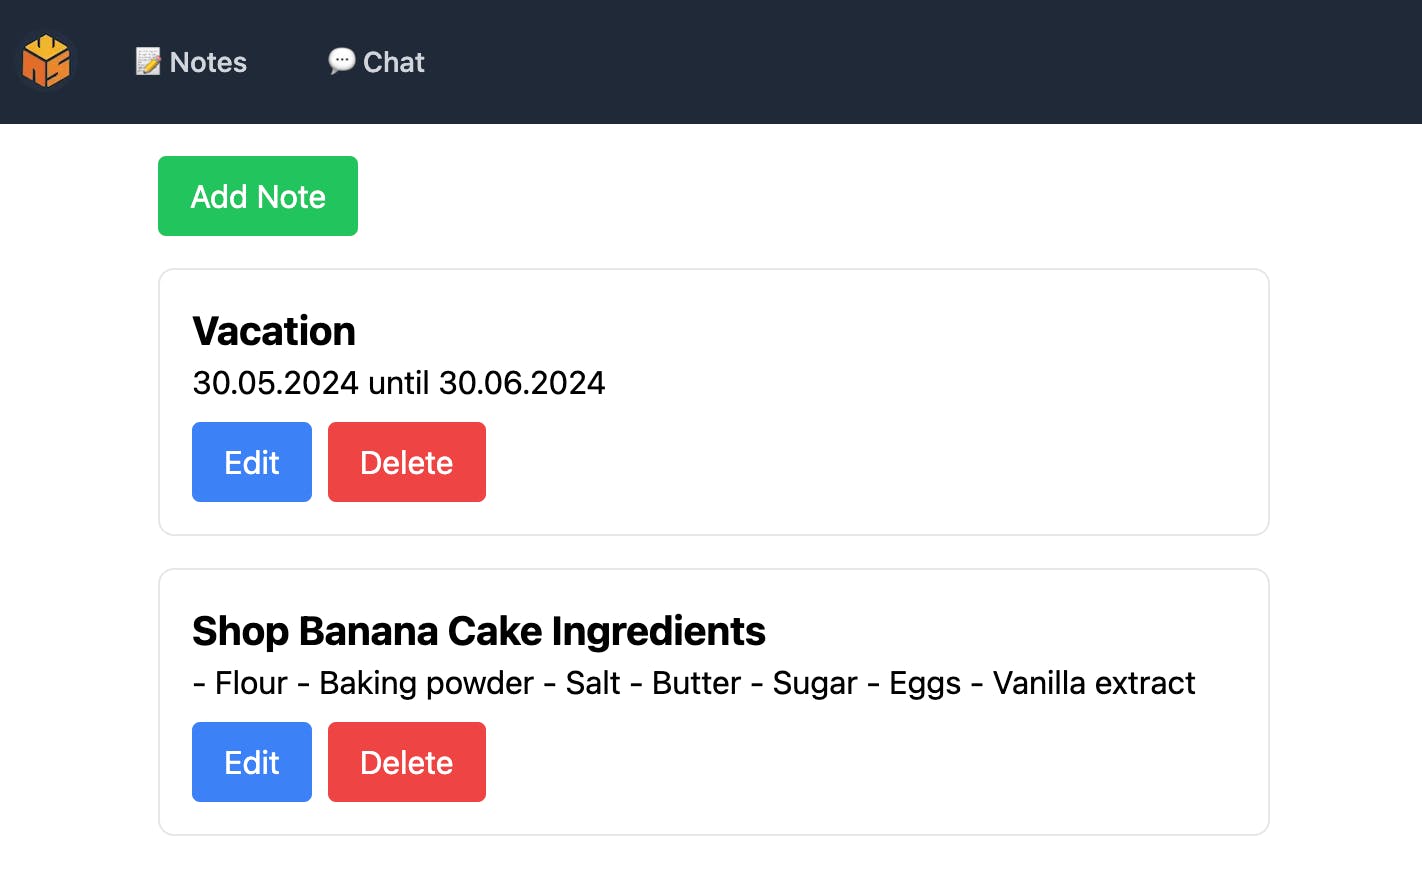
The notes view is another essential part of our interface, allowing us to add, edit, and delete notes. These notes will be later used as contextual inputs in conversations with our AI models, simulating Retrieval-Augmented Generation (RAG) but without having our own (expensive) vector database.
What functions do we need? We should be able to:
Add new notes with a simple input form.
Edit existing notes directly within the interface.
Delete notes when they are no longer needed.
There we go. It’s very simplistic but does what it should. 🎉
How Notes Are Used to Provide Context in Chats
We’ll store all of our notes and chat messages in a DynamoDB table that we’ve created in one of the first steps of our journey.
With this, we’ll be able to keep our conversation even if we reload our window. We can also always add our notes to our chat prompts to ask contextual questions to our model.
We’re doing this in a very simplistic approach: we’re prefixing the start of our chat with the current state of our notes and providing the model a little bit of information on what this is and how it should be used.
These are some relevant notes I have taken. Please only consider using this information if it seems useful for the questions that I ask you. DO NOT CONFIRM THAT you understood this. Continue with our chat as if I never provided any additional information in the first place: {notes}
Surely, this can be fine-tuned for exceeding use cases, but it already does a pretty good job with models like Amazon Titan or OpenAI’s GPT4.
Testing our Application
Let’s create a few notes and test our chat with different models.
As seen, ‘context-less’ questions are answered without issues.
Additionally, the model receives our notes so it’s able to answer questions related to our notes.
Where to Go from Here
The completion of this serverless chat application marks just the beginning of what can be an expansive project with numerous potential enhancements and features.
There are several ways you can expand this application to increase its capabilities:
Multiple Chats in Parallel: Enhance the application to support handling multiple chat sessions simultaneously. This could involve extending the backend to manage different chat threads and updating the frontend to switch between active chats.
Support for More Models: Although currently integrated with Amazon Bedrock and OpenAI, the application can be extended to support additional models from these or other AI platforms.
Dynamic Model Configuration: Implement UI elements that allow you to configure model parameters dynamically, such as the response length, temperature, and other model-specific settings. This would help to tailor the AI responses custom preferences, making the interactions more flexible and personalized.
Since this project is open source, we’re happy to welcome contributions.
Whether it’s refining the existing features, adding new functionalities, or improving the interface, every contribution plays a significant role. ✌️
Tobi & Sandro
our goal is to simplify AWS & Cloud Learning for everybody. You don't need expensive certifications to build on AWS!
AWS FOR THE REAL WORLD ⏱️ Reading time: 10 minutes 🎯 Main Learning: S3 Files gives POSIX access at S3 prices: 13x cheaper than EFS for large files, but the 60-second write-back delay silently breaks coordination patterns! 📝 Blog Post 💻 GitHub Repository 🎬 Watch on YouTube Hey Reader 👋🏽 Sandro is currently traveling through Portugal - work and fun combined! If you happen to be around, reach out. Would be great to meet up! 🤝 This week we're digging into S3 Files: a POSIX file system backed by...
AWS FOR THE REAL WORLD ⏱️ Reading time: 6 minutes 🎯 Main Learning: 5 common AWS account mistakes and how to fix each one in under 10 minutes 🎬 Watch on YouTube Hey Reader 👋🏽 New week, new AWS deep dive 🐠 In this one, we'll show you the 5 most common mistakes we've seen in almost every AWS account we've looked at. Yes, there are more out there. But these are the ones you'll see everywhere. And they're pretty simple to fix! The good news? Most of these fixes take under 10 minutes. Rather watch...
AWS FOR THE REAL WORLD ⏱️ Reading time: 9 minutes 🎯 Main Learning: Build a self-service portal that grants temporary AWS + Azure access and revokes it automatically — using Kestra and one YAML file. 📝 Blog Post 💻 GitHub Repository 🎬 Watch on YouTube Hey Reader 👋🏽 Happy new week! Tobi and I met up last week and spent some time planning the videos ahead. We’re going more and more into YouTube — and a few things I’m hyped about: The biggest AWS mistakes we’ve made (so you don’t have to) How...